Showing posts with label plate #38. Show all posts

Wednesday, October 20, 2010

Halloween Beauty


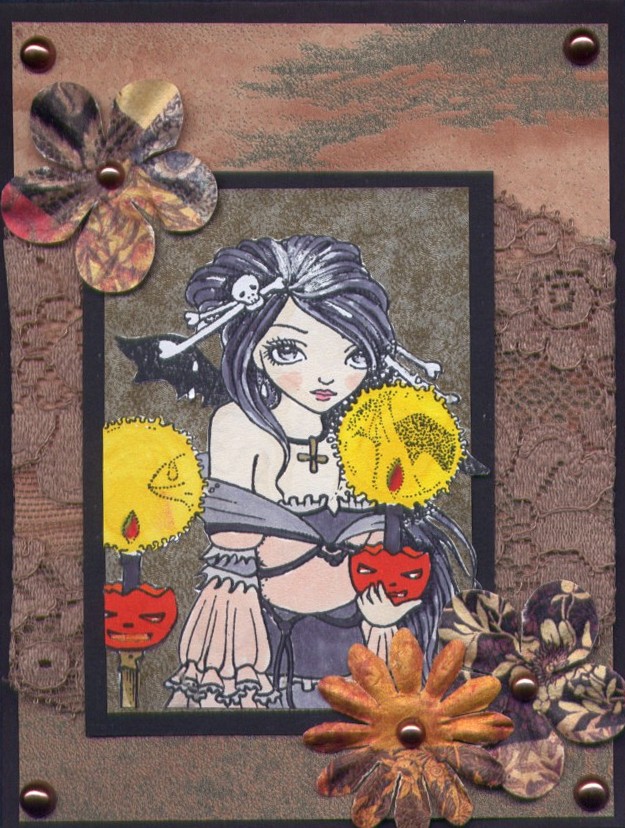
A new type of Halloween card for me! I think this image is so cool...I love the transparency of the candles. Since the image is busy I went with a very simple layout.

Supply List:
Image
Exotic Halloween, Sweet Pea Stamps

Ink
Memento, Tuxedo Black

Papers
Neenah Smooth Card stock
Black solid card stock, Stampin Up
Designer Paper-"Hocus Pocus" Doodlebug Designs

Copic Markers
Skin tones-yt0000, e00, e21
Hair-t5, t7, n9, v15, v17
Dress-v15, v17, v09, t7, t9
Pumpkin candles-yr15, yr18, w1
Eyes-b00, b01

Misc Supplies
Chalks for cheeks and candles
Stickles "Crystal or Stardust"
Sakura "Clear Star" Metallic Gelly Roll pen
Smooch "Silver"

Lisa

Monday, October 18, 2010

Exotic Halloween.....


This is one of the very first Sweet Pea stamps that I ever got and have been waiting to showcase her.  Her name is "Exotic Halloween by ©ching-chou kuik".  I think she is a sumptuous way to celebrate Halloween. She can be purchased as a single stamp or on a sheet with 3 others.


As most often I have colored my lovely with copics and then added stickles to parts of the image, got to have the sparkle!!  The glow of her candles got a nice thick coating of Glossy Accents.  My background was done with a Versa Mark pad and chalk. I used a technique for highlighting her that I saw on one of my blogging buddies posts. I took a double sided piece of DP and decided where I wanted my picture to pop out and started cutting down to the center.  After, I took each cut and an eyelet and adhered them to each other.  I left a bit of a loop on each one to give depth! I also took some crinkly seam binding ribbon that I made and whipped up the green and purple flower. I think it kept the softness of this exquisite beauty!!! 

Don't forget to visit "In A Sweet Pea Dream" and try your hand at the current challenge!

"Life's Beauty Inspires Me To Kreate"

Saturday, September 25, 2010

Cute little buttons


I haven't felt like playing with paper lately, but rather with other materials where I can use my Sweet Pea stamps.


Here I have made custom made Sweet Pea buttons. I've used nestabilities to cut out shapes in shrink plastic. I stamped with black staz on ink and set it aside to dry a while. When the ink was dry I coloured the images with oil pencils. Make sure to punch holes before you shrink the plastic. After you have shrunk them - either using a heatgun or oven - let it cool for a little while and ink the edges with a silver pen.


You can colour it to fit any piece of clothing you want and the best part: you will never have to change all the buttons because you lost one and didn't have any extra.


Stamps I have used:
pick a pumpkin plate 53
time flies, plate 38
red hearts, plate 28

Monday, September 20, 2010

Something Witchy this way comes....

Here she is, the most adorable mini witch stamp from Sweet Pea artist Elaine Cox. She calls this one "Best Friends." Too sweet. There's a whole sheet of these adorable witch stamps that are just perfect for your Halloween themed cards.I also added a great Sweet Pea saying "Have a 'boo'tiful day!" Hope this card makes all of you ready to do some great Halloween cards.

Project Materials: Cardstock (Bazzill, Neenah, DCWV Metallic); Rubber stamps (Sweet Pea Stamps); Border Punch (Martha Stewart); Sewn Border(Linda Weber); Ink (Memento, Colorbox Chalk); Brads (Around the Block, Bo Bunny); Adhesives (Pop Dots, Glue All);

BONUS PROJECT!!!!

Elegant Lady on the Moon
This stamp is an elegant image from Artist ching-chou kuik in her Fantasy Art line for Sweet Pea Stamps. My version here looks so very different from her original coloring on the website. I thought this image could also be converted into a Halloween style image if you liked. The stamp is called "Time Flies."This card folds down the center. To ensure that it opens of course, adhere the image to only half of the fold. I used a lot of white ink to make the coloring on the backdrop of the card lighter and silkier. I wanted it to look like fabric, like the image is floating on top. Then I added a row of small buttons on each side of the crease where the card folds together.

Project Materials: Cardstock (Bazzill, Neenah); Rubber Stamps (Sweet Pea Stamps); Ink (Memento, Versamark); Buttons (Jesse James buttons); Adhesives (Popdots, Glue Dots, Double stick tape); Color (Copic Markers);

Happy Stamping!!
Holley

Wednesday, September 8, 2010

A Sweet Pea Halloween


Hi everyone :) I felt in the Halloween mood yesterday when I was working on this card. Sweet Pea Stamps has some awesome Halloween images. For my card, I used an image called Exotic Halloween. I had so much fun coloring this one. I colored the image with copics, and then added some Stardust Stickles to the pumpkins. It's a little hard to see in the picture, but I added Glossy Accents to the light from the candles to give it a shine/glow. Next I created my card base out of SU cardstock. My DP is from DCWV (I just found it at JoAnn's last weekend). For some finishing touches, I added pearls, a bow, rhinestones, and roses from Wild Orchid Crafts. What do you think?

Well, that's it from me today. Thanks so much for stoppin by!

Hugs, Christine

Thursday, July 8, 2010

Magical Enchantment

Magical Enchantment

Hi everyone,

I always have such a hard time deciding which of the gorgeous stamps from Sweet Pea Stamps to play with and in the end I close my eyes and let my fingers choose, lol.

For my post today, I (err, my fingers) chose "Winter Watcher" from Plate #38 and colored her with Copics. Because I always color my images without choosing the paper, I had a hard time coming up with papers to go with the colored image. I really wanted match the papers with the cat's eye and finally decided to use the lavender flourish from DCWV's Old World Stack.
The black panel is dry embossed with the CB Textile Texture embossing folder. I found some copper pigment ink and rubbed this over the panel. I wanted to bring out a little of the yellow from the background and the bodice of her dress so I added the dried flower buds. I also added the die cut leaves and black metallic craft trim. Lastly I added the sentiment, also from Plate #38.

You know, I very rarely know what colors I'm going to color these wonderful images and lots of times will start an image only to think I've ruined the image. In this case, I over saturated the eye of the cat which caused the purple to bleed into the area under the eye. I used the light gray C02 marker to push the stray color back. Now it just looks like the fur around the eye is wet, right? Well, that's what I'm telling myself :-).

Thanks so much for stopping by. Definitely check out the store!!!! Make sure to check out the SALE section..... you'll be glad you did!

Wednesday, July 7, 2010

Exotic Halloween

Continuing my recent dark mood, Exotic Halloween seems to fit right in. I do love Halloween and all the spooky things that come with it.

The card was created with Club Scrap Card Stock along with some unknown paper, Hero Arts flowers, Copics and Queen &Co. pearls.

Friday, June 25, 2010

Magical wishes


The image I've used is called time flies. I thought this image really suited the blue paper as it has swirls and butterflies on it. I really wanted to make the card over-the-top as I sometimes feel like I don't decorate enough. I love those decadent cards with enormous amounts of embellishments and layers. So whenever I felt like stopping myself I ignored that impulse and inked, tore and layered some more.

I worked quite a while on this card and loved every second of it. As usual I coloured the image with promarkers, cut out with a circle nestability and layered on a bigger circle of orange bling cardstock. I added stickles glitter in colours "waterfall" and "stardust" on her and on the middle of the cut-out butterfly. The blue card base is stamped with a butterfly stamp with versamark ink and then embossed with a light blue embossing powder with some glitter in it. On top of that I added a piece of orange patterned paper with glitter embossed parts. I tore the top and bottom to make it a bit more vibrant. On top of that are two pieces of paper. They are actually cut as one strip from a 12x12" paper and then cut in two. I used a corner punch on them and after that I cut out a scalloped circle with my nesties which I embossed with a cuttlebug embossing folder. Finally I stamped the text "mystical wishes" that can be found on Elaine Cox' sheet 5 plate 46 in a blue ink and embossed with glittery powder. I then layered it on a tiny piece of orange bling card stock and attached to the right hand side of the card. And there you have it :)


/Katarina

Thursday, June 24, 2010

Connie-Exotic Halloween


I know it's not Halloween yet, but this image by ching-chou kuik
draws me and I finally gave in and used it.
I stamped it with Memento Tuxedo Black dye ink and colored with Copic markers.
I see that I need more blacks and grays for better 
shading, but hey!  I am trying!
I cut her out with a Spellbinders "Classic Frame" die and sponged green dye ink on the edges.
I tied some raffia and a tiny little mint bone around one side 
and added some glittery flowers in a corner.
Some PPA with a sprinkle of glitter added sets off the aura around
the candles.

Below is a closer view that hopefully shows the glitz:


Aren't those pumpkins just the cutest??
Connie

Monday, June 7, 2010

Carnival mask


I'm finally back with a project that I'm over the moon about. I got the idea as soon as I saw masked fairy in green. She is holding a mask which I thought would be wonderful for this project.

This is my first try to decorate something that isn't too flat. I'll share my tips with you so you can do the same. It's not that difficult, but the result is stunning.

Here's what I used:
a plain white mask - I got mine in a hobby store for $3
some kind of ink or paint - I used distress ink in green, blue and red
a selection of stamps and thin paper (like the one you use to gift wrap)
decoupage glue
black ink + colouring medium - I used promarkers
glue
ribbons and bling
my sewing machine to attach ribbon to the rubber band (optional)


Start by inking the edges of your mask. Don't ink the mask itself unless you know exactly where your images will go. After making the left side I thought I was done so I inked the right side with bright red. Then I realized I wanted another image to be the focal point. Unfortunately when I glued her on, the bright red shone through. That's why the fairy on the right is so red around her face. So learn from my mistakes :)

Set the mask aside to dry and stamp up your images on the paper (I only had light pink, a packaging from a gift, but if you want your colouring to be more accurate you should use white. I used what I had). I tried to stamp where there were no creases to get a good impression. I also tried to choose stamps that could easily be cut out with no tiny details. Colour them and cut out.


Now for the fun, and scary part! Gluing them on. DO NOT put the decoupage glue on the images. Since the paper is so thin it will rip. Put the glue on the mask instead and the image on top. If you have slightly more glue you will be able to smooth the image out properly. Put the images so they go outside the edges. Cut away so there is about 1/2 inch or less and fold it around the edges.


Work this way one image at a time. Don't be afraid to use parts of an image to cover up any white parts. I used a wing to cover up a spot on the top.


When you're happy with the result fill in any white parts with ink or paint. When it's dry, brush on some decoupage glue over the whole mask to seal it and make it more durable (we wouldn't want the mask to get ruined in the champagne rain, right?)
Now the only thing left to do is to decorate the mask even more. I thought it looked great as it was, but something was still missing. I inked the rubber band, but didn't think it looked elegant enough, so I tried with different ribbons and lace I had until I found the best combo.


The trims I used were stretchy which was perfect for the rubber band/neck holder. It doesn't have to be perfect, just needs to stick.  If you don't have any stretchy trims you could cut away the rubber band and attach long silky ribbon that you tie at the back of your head. Didn't think of it until now. I sewed mine on with a seam made for stretchy fabrics. Another solution is to pull the rubber band while you sew. This will make the ribbon you use to scrunch up when the rubber band goes to its original form.


When you're happy with that attach some trims around the edges. I found these mini-clasps a tremendous help while waiting for the glue to dry. Just make sure you don't leave them over night as they will glue to the mask!


Finally glue on some bling around one of the eyes.
Tadaa! You have the most wonderful (if slightly itchy around the forehead) mask on the whole carnival.


Here's a tip when working with the images: If you want to use an image and a side is "chopped off" so to speak, you can either put that side close to an edge OR do like I did with the image above. If you have an eye for details you will notice that the wings are not really hers. I used a wing from  midnight waiting, stamped it twice and coloured one from the front and one on the back of the paper to make it mirrored. Then they are cut out and aligned so the main stamp image can be put on top without the edges showing through - because they do. Another reason that this stamp was so great - her straps on her shoulders cover up the edges.


Stamps used for this project:
Masked fairy in green
Moonlight whispering
Love is gone
Midnight waiting
Forest blue
Time flies


Hope you've gotten inspired to use your Sweet Pea images for other than just flat items. If you do, make sure to let us know so we can take a look.

/Katarina

Wednesday, April 28, 2010

Moonlight Whispering

Hello! For my card today I have used the gorgeous Moonlight Whispering from ching chou kuik's Fantasy Art Collection (sheet 11, plate 38). The sentiment is from sheet 2, plate 21.
The Details:
Stamps: Moonlight Whispering - ching chou kuik's Fantasy Art Collection (sheet 11, plate 38), sentiment (sheet 2, plate 21)- Sweet Pea Stamps
Paper: Basic Grey (Urban Couture), Dark Chocolate, White (Paper, Trey, Ink)
Ink: Memento Tuxedo Black, Walnut Distress Ink
Copics:
Skin: R00,E00,E11,E13,R20
Hair:BV000, BV01,BV02,B63,BV04
Clothes: R32,R35,R37
Cat: E25,E27,E29,E49,R00,R20, YG00,YG03,YG17
Misc: EK Success Border Punch, Recollections Pearls, Stardust Stickles

I hope you day is wonderful!
:-)Traci

Saturday, April 24, 2010

Connie-"Time Flies" Made Time Fly For Me!


I was drawn to this lovely image by ching-chou kuik
when I first saw it and still love it. It is named
"Time Flies" and you will find it on plate 38
I used Cryogen White cardstock to stamp her on and colored with Copic markers.
I layered papers by DCWV "Old World" and Basic Grey "Sugar Rush".
I punched some leaves (Punch Bunch) a small tree (EK Success)
and the flowers were punched with my *new* Nellie Snellen punch that is a set of punches that also embosses the punched shape.  I cut them from the same papers I used for layering.
Here is a closer view of them:
A little sheer ribbon, some pearls by Kaiser and rhinestones by K and Co.
tops this one off.
I am really trying to improve my Copic skills, please bear with me.

Sunday, April 18, 2010

Fluttering Butterflies

I am here to show you my DT card I created with one of the newest Ching Chou Kuiks Fantasy Art Collection called Fluttering Butterflies( sheet #11/plate #38 at Sweet Pea Stamps). If you click on the picture you can see a lot more of the details in this image, that's hard to see without blowing it up. I used some s.e.i DP from the Chocolat collection. I just love this DP! All the butterflies, flowers and glitter. I also love the pink and brown color combo. All DP came from the same pack. I used a Bamboo Sizzix die with some dark brown CS and a Dogwood sizzix die with some dark pink CS. I added some brownish gold glitter glue to the die cut shapes.


Skin:E50,E00,E11,Rvooo,RV02,R83
Hair:E50,E51,E53,E55
Dress: E79,E77,E74,E71
RV69,R85,R83,R00,RV000
Wings and Butterflies: RV69,R85,R83,RV000
E40,E71
Background: Rv02,Rv000,R00,W3,W00
Lantern: E30,E40,E41,Y21
Moon: Y0000,Y00,Y11,Y21,YR20

Friday, April 9, 2010

Is it Halloween Yet??

I Have 2 cards to show you today. This 1st one I created with a Sweet Pea Stamps image by Elaine Cox (Sheet#3/Plate#40) and this is from her last release. And her name is Brown Hat Spring Fairy. As you can see her hat's not brown. I decided that this image wanted to be created into a halloween card. I love the way the purple and green turned out.. this card is so bright and vibrant (So pretty in person).
And I also decided to stay with the Halloween theme and I used this image from (Exotic Halloween) Sweet Pea Stamps by Ching Chou Kuiks (Sheet#11/Plate#38). It is so hard for me to put down these stamps as I just love coloring and creating with them!! They make me feel like an artist!! And anyone who knows me knows I can't draw!!! Not even a little!! So coloring these beautiful images is the closest I'll ever get to being an artist!!


In this picture you can see the Glossy Accents I added to the glow from the candle light.
Ink: Memento Tuxedo
Paper: DP - Cloud Nine,Textured Green CS, black, purple and orange CS(DCWV)
Image stamped on Neenah Solar Crest( THIS PAPER IS AWESOME)
Accessories- Bare tree die cut, glitter glue, Fiskars punch
Copics Used:
Skin: E50,E51,E00,E21,C1, Blush(RV02,Rv23,Rv10)then went back over with E50
Eyes: E55,Y26,E50,Y0000
Hair: C7,C5,C3,C1,C0, Copic multiliner
Clothes:V04,V09,V15,V17,BV02
Hat: YG03,YG06,YG23,YG25,G05,FYG1(Fluorescent Yellow)
Owl: E30,E33,E37,E17,E18,E40,E41,E47
Background: BV23,BV20,BV02,Bv31
Other: YG23,YG06,FYG1,YR09,YR16,YR04,Y08,Y06,Y11
2nd card
Ink: Memento tuxedo
Paper: DP- Cloud Nine, DCWV (CS Black, Eggplant, Textured purple (CTMH)
Image stamped on Neenah Solar Crest
Accessories: Spellbinders Pendant Die, Sizzix decorative corner Die, Martha Stewart Drippy Goo Punch, Glitter Glue, purple bling, black brads, Glossy Accents
Copics
Skin: E50,E00,Rvoo,E51,RVo2,R83
Eyes: G05,YG23,FYG1
Hair: 100,C9,C7,C5,C3,C1,B60,BV31,V04,V15
Clothes: C9,C7,C5,C3,C1,V04,V15,BV02
Pumpkins: YR09,YR68,YR16,YR04,C7
Candle Light- Yoooo,Yoo,Y11,Y06
Background: C0,C1,C3,C5,BV20,BV23

Time Flies


Times Flies from ching-chou kuiks Fantasy Art Collection is a classic beauty. I was able to pair the image with some washi paper sent to me from a friend in Japan. I used my gold paint pen to edge the image, paper and border. I also put some gold on the white brads so that it all matched the gold in the paper.

Monday, April 5, 2010

Imagine and Wish


Today I've been crafting a lot. I've been shifting from sewing a bag (almost done) to cards and a cross stitch while I'm watching whole seasons of a show from the very beginning. Very nice :)


I've been trying to catch up and make some more projects using my Sweet Pea Stamps (that haven't seen ink yet poor things) This one is called Moonlight Whispering. I really want the stamps to "pop" so I try to leave the layout quite simple.

The image is coloured with promarkers and oil pencils. I also coloured the edge and tags with turquoise oil pencil to distress them a bit. The frame is a spellbinder's die and cut out in silver mirror paper (although it looks gold here. It was quite hard photographing it). 


I have made a tutorial on how to make the bow. You will be able to find it under "tutorials" in the sidebar.

/Katarina