Showing posts with label Plate #76. Show all posts

Friday, July 1, 2011

Multi coloured blocking


I've had so much fun playing with today's card. It's a technique I've never used before I think and I came up with it all on my own (although I had inspiration) I'm proud of it and thought I'd share it with you.

If you're not very happy with your colouring of the sweetpea images  - you don't have to be! There are so many ways to use your stamps and this is one of them.


I started by inking different stamps in different bold coloured inks on white paper and embossing them with clear embossing powder. After the powder has cooled off I inked the whole image with a contrasting colour with a direct-to-paper technique (which means you dab the inkpad directly on the paper) When I was happy with the result I wiped the images to remove any ink that was left on the raised embossed part. This will make the images pop. Finally I cut out different sized blocks and mounted them together. I added the little ribbon and bow to add some more interest to the card.


It's a super easy technique and I hope you'll give it a go. All you need is some embossable inks (I used small versacolor) and some clear embossing powder. Have fun!

Images used:
ching chou kuik: Seahorse plate 79
ching chou kuik: cheshire cat illusion plate 41
ching chou kuik: autumn harvest plate 57
Elaine Cox plate 102
Meredith Dillman: peacock fairy plate 76
Nikki Burnette: Tulsa
Sentiment: plate 30

Wednesday, June 22, 2011

Phonebook


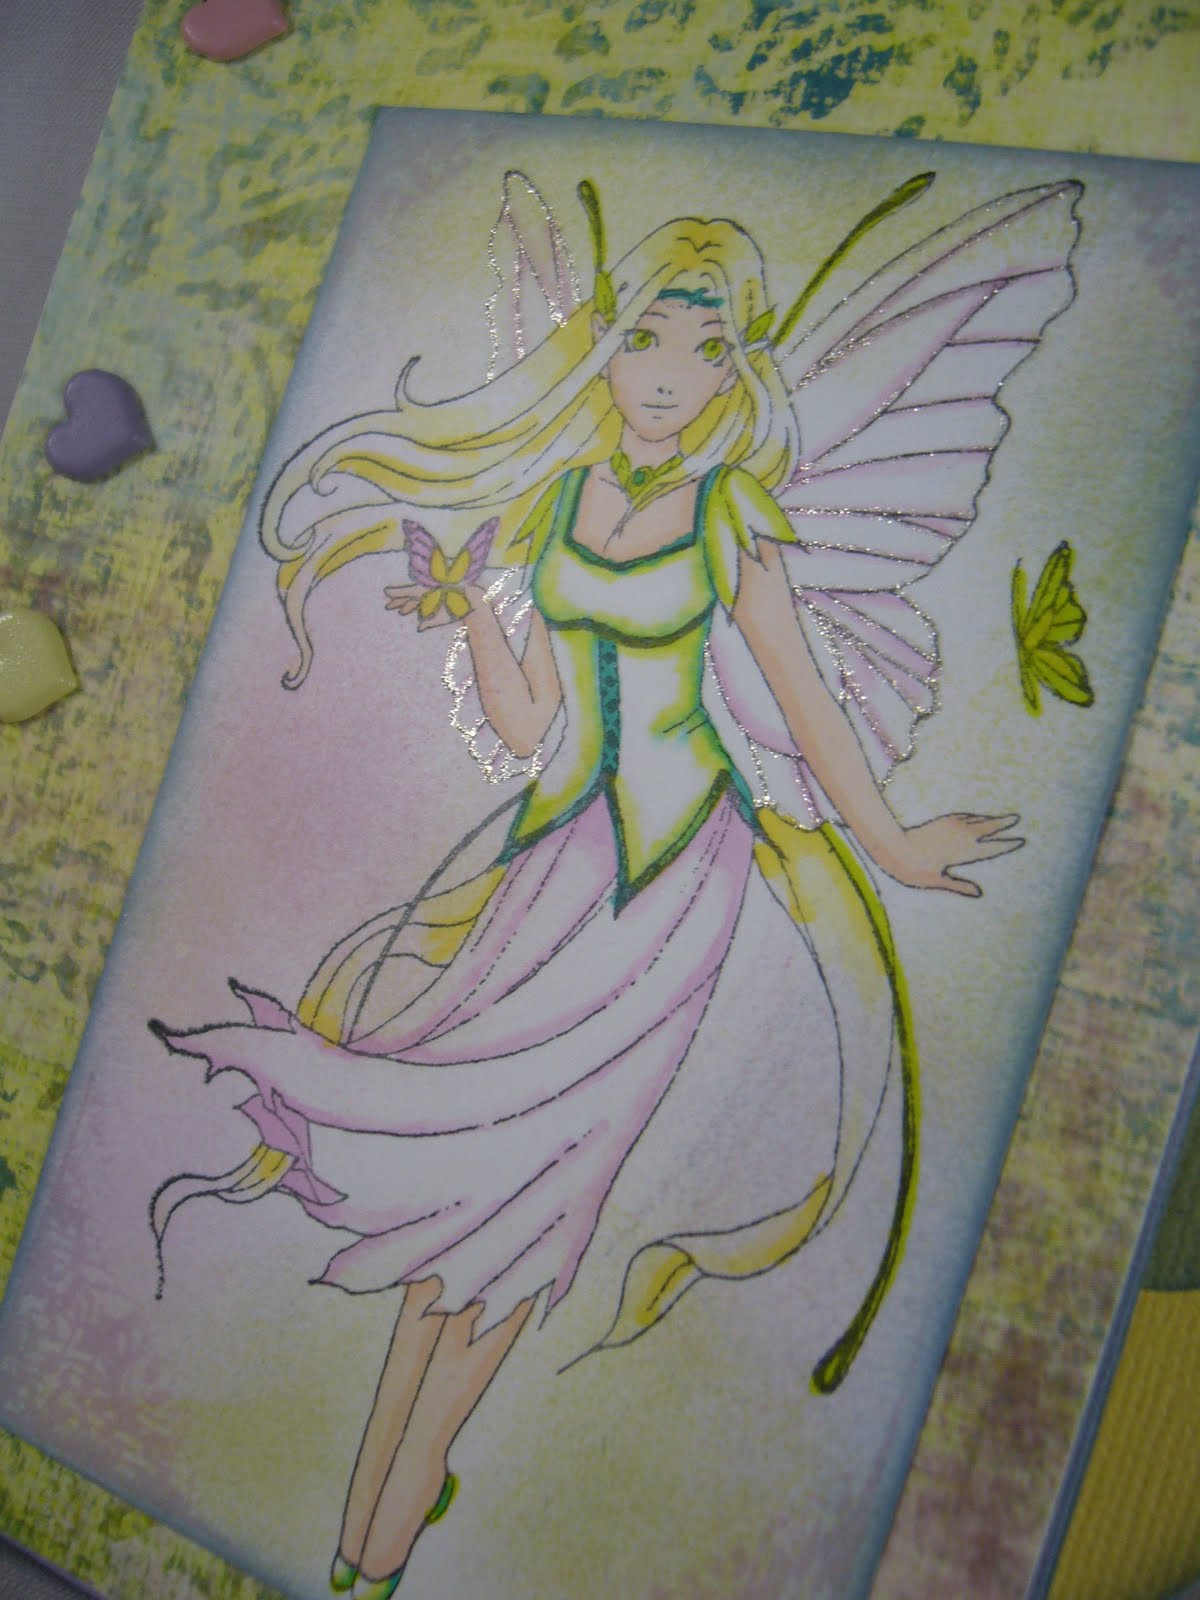
I hope you are enjoying the summer and playing with your sweetpea stamps. I still have a lot I've never used and this is one of them. It's by the very talented Meredith Dillman and is called blue fairy from plate 76. Isn't she gorgeous?

I've been in desperate need for a new address book the last couple of months. I have everything written in a simple notebook with no order and it's been driving me crazy having to flip through the whole thing to find what I need. So during my last flipping I got really annoyed and decided to make this book I've been planning for ages. You can use it for anything you might need to find fast: your kid's friends numbers, people on your Christmaslist or why not a page per month writing down how much you've exercised or your measurements.


I started by cutting out 6 pages in cardstock and 2 in patterned paper for the front and back. I used a qk die so the holes were already there for the brads, but it's easy to make yourself. You will need to score on each page to make it possible for it to open. I also cut out 6 qk tabs in the same cardstock. The pages and tabs are inked on the edges with distress ink to give a neater look. The image is coloured with promarkers and the background with distress inks. The fairy has some sparkle on her wings made by a sakura gelly roll. I also used one of the corners from Holiday (plate 12) to add some interest which I'm very happy with. I inked one corner in a purple distress ink and stamped on all 4 corners of the image. Finally I attached the tabs, image and brads. Finally I'll be able to find what I need quickly!

Thursday, April 21, 2011

It's never to early...

It's never too early to start making Christmas card right?  I am one of those people that always have the good intention of making Christmas cards for my family, but come December I am rushing out to the shops to buy some.  So this year I am starting early.
I decided to make a set of Christmas cards using the gorgeous fairy images from Meredith Dillmans Sheet #1, Plate #76.

Japanese Fairy

Blue Fairy

Fairy Lights

As well as being available on a Sheet #1, Plate #76, these images can also be purchased separately. I am so glad I have made an early start. Who knows come December, it may not be a mad rush to buy Christmas cards.
Thank you for joining me today.  
Renee

Friday, March 11, 2011

Peacock Fairy, Bling and Lots of Embossing!


I LOVE these fairies from Meredith Dillman! I especially love this peacock fairy!
 They are so pretty and delicate...(and fun to color)!
I used copics to color this little gal and then I followed a sketch on Split Coast Stampers and she fit it PERFECTLY! I LOVE when that happens! I got out my embossing folders and tried a new technique too! I rubbed versa mark on one side of  my embossing folder and then I put the card stock in and ran it through the cuttlebug. I then used pearl ex to highlight the embossed paper... it shows up more at the top. I sprayed the paper with smooch spritz (white AND brown) and added BLING!!! Here is my super fun card and i thought that the fleur de lis was the perfect touch for Mardi Gras! Thanks for stopping in and have a wonderful day!

Tuesday, March 8, 2011

Tea Anyone?

This adorable stamp comes from artist Lisa Victoria and is called "Bubble Fairy". You can find this stamp on Plate #49. I love this adorable little fairy taking a luxurious bath in a tiny tea cup. I used some stickles to highlight the bubbles in the bath and Gel Pen to illuminate the wings on the fairy. It's hard to see the wings because the shade of white and puffiness of the ink doesn't show up well in the photo.
I thought this saying went well with this card "Music washes away from the soul the dust of everyday life." It comes from Plate #76. I added some wonderful Prima flowers and Making Memories brads to the paper to highlight the final image.

Have a Fairy Day!

Holley

Monday, January 31, 2011

Got Butterflies?

I love all of Plate #76 drawn by Meredith Dillman for Sweet Pea Stamps. Each one of the faries are stunning and have fabulous details. This image is one called Blue Fairy.

  Fairies and butterflies, so perfect together.

Get Inky!
Alex

Tuesday, January 18, 2011

Fairy Lights


Hi everyone. For my card today, I just had to ink up this gorgeous image by Meredith Dillman, available at Sweet Pea Stamps. This particular image is called Fairy Lights and I think she's gorgeous. I colored the image with copics and then sponged around the image with my Tim Holtz blending tool using SU's Pretty in Pink ink. I then added Stardust Stickles to her wings. Next I created my card base out of SU cardstock (Rose Red and Not Quite Navy). My DP is from MME and I used a Martha Stewart border punch on the top panel of DP. For some finishing touches, I added a bow (tied with my Bow Easy), dew drops, and roses from Wild Orchid Crafts. What do you think?

Well, that's it from me today. Sorry to make this so short. I hope you all have a wonderful day and thanks so much as always for stopping by.

Big Hugs, Christine

Tuesday, December 28, 2010

Connie-Meredith Dillman Peacock Fairy


Today my card is by Sweet Pea Stamps artist Meredith Dillman, plate #76
and you will find her delightful art made into 
deeply etched red rubber by clicking
I made the custom frame by running 2 different
sizes of Spellbinders dies from
their "Labels 9" set through the
Cuttlebug at the same time.  I cut them and then embossed them together.
I popped up the frame for dimension and
sponged some powdered shimmery chalk
by Stamp N Plus "Stardust" around the image after
I colored with Copic markers.
I added a rose by Prima "Fairytale Rose" and
a pearl swirl (unknown).
A small dp strip across the center got a little lost in the 
riot of pattern but it is there.
Please excuse my coloring today.  I couldn't seem
to hold the marker still enough to stay in the lines.....
I've had a death in my family so I am
slightly shaky.

Thanks for looking.
Connie

Thursday, December 23, 2010

Fluttering Fairy Christmas

I have 2 Sweet Pea cards to share with you today. Both of my cards I used 2 of Meredith Dillman's images/stamps at Sweet Pea Stamps. This first one is called Fairy Lights and you can purchase her by herself or on a sheet of 3 other GORGEOUS stamps, sheet #1/ Plate #76.


For my second card I used Blue fairy by Meredith Dillman and she is also on the same sheet.


This one I made months ago. It was when this set first came out in the summer and I forgot to share it with you.

The image is from Sweet Pea Stamps called Holly Fairy and she can be purchased as a single or on a sheet with 3 other beautiful Christmas images on it(Sheet #21/ Plate # 60 by ching chou kuiks)

I used some DCWV older Christmas DP. I added some lace and some American Crafts Holly Leaves and flower that I added glitter glue to then some MS fine glitter. I also added some ribbon from my blogging friend Rellz. I colored the image with copics and added some more glitter glue and fine glitter to the leaves.

Have a wonderful day and a Happy and safe Christmas!!

Friday, December 3, 2010

Make Believe


Hi everyone! :) For my card today, I'm so excited to share with you another new artist for Sweet Pea Stamps. This beautiful fairy image was illustrated by Meredith Dillman and is called Blue Fairy. Isn't she pretty? She was so fun to color. I colored the image with copics and then lightly sponged around the image with SU's Bashful Blue ink using my Tim Holtz blending tool. Next I added some Stardust Stickles to her wings. I then created my card base out of SU cardstock (Perfect Plum and Not Quite Navy). My DP is from K&Co. For some finishing touches, I added a bow (tied with my Bow Easy), dew drops, Primas, roses from Wild Orchid Crafts, and swirls made from an EK Success punch. What do you think?

I hope you enjoyed my card for today. Make sure to head over to Sweet Pea Stamps and check out all the new artists. Thanks so much as always for stopping by.

Hugs, Christine

Wednesday, December 1, 2010

Let there be light!


I know I always say I had fun when I share a new project with you....but this time it's even more true! This little fairy is so beautiful and an absolute joy to create with. I decided to make it a standing piece instead of a regular opening card. I made a template for the bracket so you can see how I did it. Do be sure you use a thin card board for this instead of a regular card stock. It needs the thickness to make it stand. The template for the standing card bracket is here. You can certainly re-size it to fit any size project.
This little fairy is by Meredith Dillman's Fairy Lights. I love the soft, delicate lines. I used blue, black and white chalks to make the dark background around her. Her hanging lantern glow is yellow chalk.
I hope you found some inspiration from this!

Supply List
Image
Fairy Light, Meredith Dillman for Sweet Pea Stamps Plate 76

Ink
Memento, Tuxedo Black

Papers
Neenah Smooth white card stock
Solid color card stock-Bazzill Basics
Multi color designer papers-unknown manufacturer

Copic Markers
Skin tones-yr0000, e000, e21
Hair-e97, e15, e99, e09
Dress-b95, b97, b99, yg91, yg93
Wings-w1, b0000, b000, 0
Lantern-b95, b97, yg91, yg93, y21, y32

Misc. Supplies
white paper doily, Wilton Cake Supplies (colored e31)
Copic Atyou Spica Glitter Pens-Sand and Silver
Sticky blue pearls
Holtz Distress ink pad-Faded Jeans
Prima flower
Spellbinder/Nestability Die-Labels 4
Wide blue satin ribbon, Hobby lobby by the yard
Chalks for cheeks, lantern glow and background
Smooch "Illuminate" for wings
Thin cardboard for backing and standing bracket
dimensional adhesive
Scotch ATG gun and adhesive
Cuttlebug or Big Shot

Wednesday, November 24, 2010

A Trio of Fairy Muses


Stamps: Meredith Dillman's "Japanese Fairy", "Peacock Fairy", & "Blue Fairy" Plate #76

For today's card I used the beautiful fairy images from one of the new Sweet Pea artists, Meredith Dillman. I love the anime feel to these, so I decided to use some vivid colors combined with the Copic Fluorescents. I then cut them into 1.5 x 3.5 inch panels. They are outlined with my favorite Platinum Stickles. The background paper is the Fairy Flora line from Prima.

Monday, November 15, 2010

Fairy in Olive


I was so anxious to ink up one of the new Meredith Dillman fairy stamps for this project. I love fairies in earthy tones! There are so many beautiful new images. Click here to check them out!

Supply List
Image
Blue Fairy, Meredith Dillman for Sweet Pea Stamps Plate 76

Ink
Memento, Tuxedo Black
Papers
Neenah Smooth white card stock
Solid color card stocks-black, old olive and gray from Stampin Up
Multi color designer paper-Basic Grey "Eerie"
Purple designer paper-Stampin Up

Copic Markers
Skin tones-yr0000, e00, e21
Hair-e50, e51, e13
Dress-yg91, yg93, yg95, 0
Wings-w1, w3, ww5, e00, e01, yg91, yg93
Butterflies-bv11, bv13, bv17

Misc. Supplies
Martha Stewart Ribbon Loop Corner and Border Punches
Chalks for cheeks
EK Success corner punch
Sticky gems, purple and black
Smooch "Illuminate" for wings
Inkssentials, Ranger Glossy Accents for wings
Black organdy ribbon
dimensional adhesive
Scotch ATG gun and adhesive
Lisa