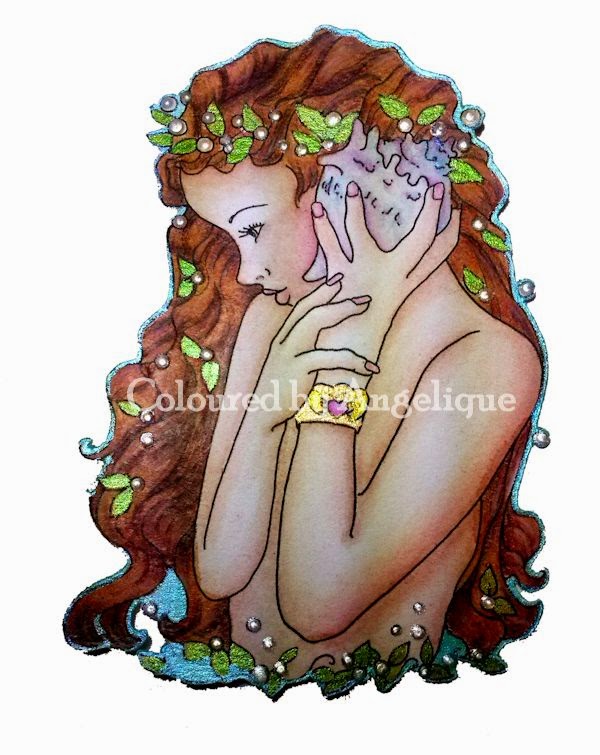
Today is my day to showcase and image from Sweet Pea Stamps and I have chosen to work with the beautiful image
Ancient One by Joanne Schempp which is available from the
Sweet Pea Store in both rubber and digi.
I have not tried mixed media like this before so be gentle with me :) :) I am in awe of some of the mixed media projects I have seen on the web and just could not resist giving it a go. To begin with I printed my image, well two as I was thinking about having another Joanne Schempp image of the sail ship in the background but had not totally made up my mind. The idea soon flew out the window and I decided I did not need it.
Next I raked out a whole load of dies and double cut them using stiff white card. The dies I used were Tattered Lace Retro Alphabet, Memory Box Splash Border which I cut up into two sections and also used the spiral excess bits of the die and finally Marianne Designs Creatables Anchor. I also added some Flower Soft and some bead and metal shells.
I don't have many supplies for this sort of project as not much is available in Saudi Arabia, or a least I have not seen many products around but I do have some white acrylic paint so that is what I used to paint over the background ready for airbrushing with Promarkers later. Next I coloured the image with just one colour of blue Promarker, trying to build up the colour but using several layers.
Onto the background, I first masked my coloured image and set to with the airbrushing in two colours of blue, one was Bluebell but I can't remember what the other was lol - afraid I was having to much fun to remember to write down what I had used.
Next I stippled some PVA glue in areas and then stippled with silver bronzing powder on top. I added lots of Pearl and Silver Liquid Pearls to the digi.
Not quite happy with the digi so using the darker of the two blues I used for the background I added a bit more depth to him. Finally I added a silver ships wheel charm and three brads. A blast of Crafters Companion Silver Varnish and all done. This decorated mat was then mounted on a silver mirror card mat, a navy corrugated mat and then a mauve mat. The group was them attached to my navy card blank.
For the inside of the card I used Spellbinders Labels 1 and a Spellbinder embossing folder. A bit more of the silver bronzing powder and another anchor completed this section.
And here we have it - a rather funky man card. For a first attempt I am pretty pleased with myself and most of all I had amazing fun, getting covered in paint and glue I felt like a kid all over again, such a fun day :) :) :)
Ingredients:-
- Image - Ancient One by Joanne Schempp
- Colouring Medium - Promarkes, acrylic paint
- Dies - Tattered Lace Retro Alphabet, Memory Box Splash Border, Marianne Designs Creatables Anchor and Spellbinders Labels 1
- Embossing Folder - Spellbinders Seashells
- From my Stash - Silver Bronzing Powder, Liquid Pearls, shells, metal shells, ship wheel charm and brads
Thank you for stopping by today and hope you have a happy crafting time ahead of you :) xx


.JPG)


.JPG)


