Showing posts with label Plate #1. Show all posts

Wednesday, August 24, 2011

Mermaid Nostalgia

Hi Everyone,

I decided to get a bit nostalgic and pulled out Plate #1 to color up one of the very first Sweet Pea Stamps mermaids. I know some might consider the mermaid a bit risque.

I certainly don't, however, I had some distress inked seam binding left over and decided add it.


All coloring was done with Copics, after I die cut the image, I used Distress Inks to darken the edges. The paper is Pool Water from Paper Pizazz and the gemstones are from Martha Stewart.

I left the card simple because I thought too many embellishments would take away from the image... ok, actually I was running behind and I was pleased with the way this oldie but goodie mermaid turned out :-).

Lots of new releases are at the Sweet Pea Stamps store, but don't forget to check out some of the older plates..... they are just as gorgeous, sassy and fun to color as all the other awesome stamps.

One more look at the finished card:


Tuesday, April 5, 2011

Almost Easter....

Hi Everyone,

I thought with Easter right around the corner, I would color up ching-chou kuik's Fantasy Easter Ocean from Plate #30.

I'm excited to say that I've finally tried my hand at easel cards. Not just a regular easel card but a twisted easel card with an additional twist:


Intimidated by easel cards would put it mildly. They down right scared me, however, stubbornness prevailed, lol and OMG, they are a blast and are truly easy (even for "get-it-wrong-try-again" me).
And with these beautiful Sweet Pea Stamps images, I'm always thinking that they need to be displayed. These easel cards are perfect for the recipient of the card to display right out of the envelope.

Since I always stamp out several images at a time, I have a drawer full of ready to be colored Sweet Pea Stamps images as was the case with Fantasy Easter Ocean.
She is stamped with Tuxedo Memento ink onto Gina K 120# pure Luxury card stock. This card stock is awesome to use if you do NOT want any bleed through from your copics, however, the blending is a little different. For one thing, it takes a lot more ink to soak the card stock and even then the end result is still not like it would be using Neenah Classic Crest Super Smooth. But that's ok, I love to see different results.

Now the added twist to my Twisted Easel card is that I did not use a "topper" which sort of allowed a 3-D effect when the card is twisted into the easel form. Oh, this is only my 2nd ever easel card created so as is the norm, there are some goof ups...:

Here is the card closed:


The sentiment in the left hand corner is from Plate# 1. I once again used some left over gift tissue, scrunched up as a border. Double stick tape works great when one is too lazy to pull out the sewing machine :-).


The "Happy Easter" sentiment on the inside is from Holiday Verticals, Plate #13 stamped, then cut apart.
Of course I didn't take a straight on shot of the sentiment, but you get the idea.

Fantasy Easter Ocean is a gorgeous image stamp and perfect for Easter or any time of the year and NOW is the time to get this gorgeous stamp if you don't already have her in your stash. Fantasy Easter Ocean (single stamp) is on sale .... right now. Hurry over to the Sweet Pea Stamps shop today!!!! You'll be glad you did!

Thanks for stopping by.

Tuesday, August 24, 2010

Flower Tail Mermaid Dreams

Hi everyone,

Isn't it funny how mistakes or 'oopses' as I like to call them lead to new techniques or looks? Case in point, Stickles.

Before I tell you details of my 'oops', a few details about my card:


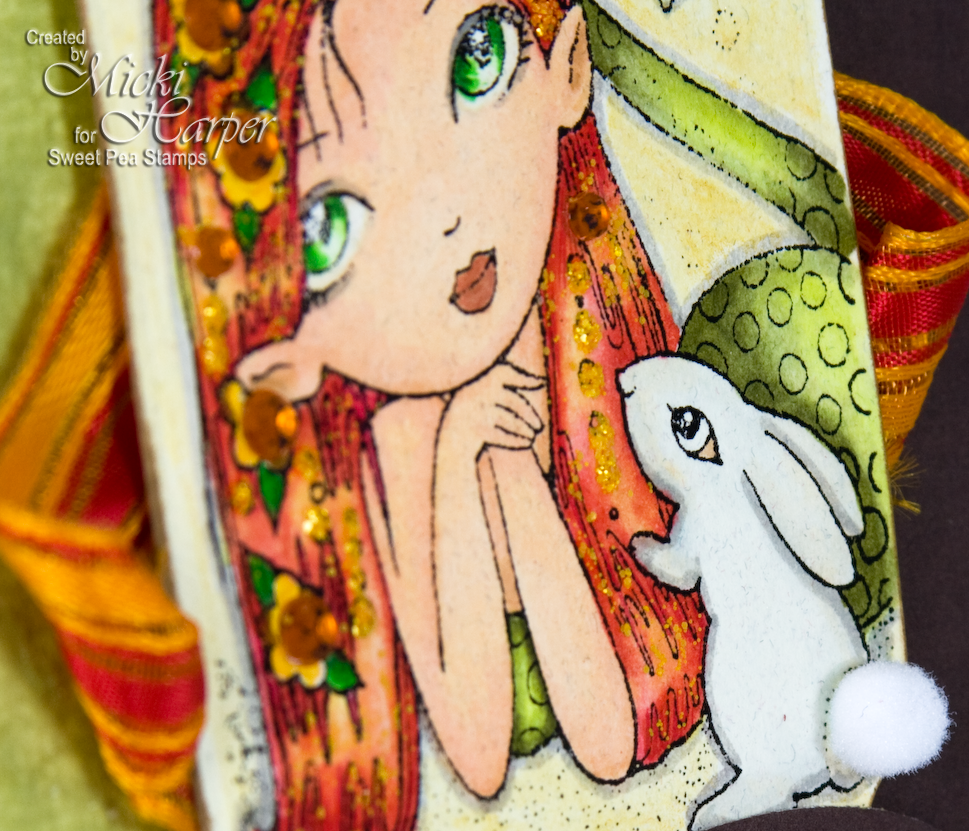
For my card today, I used Elaine Coxs' Flower Tail Mermaid from Plate #48. She is stamped onto an ivory card stock. The base coloring is with Copics, then I went back with my Pitt Artist Pens and added some detail. Most of the detail is so subtle you can't see it in the picture, except for her tail. I also used the gray Pitt Artist pen to outline the stamped image. This I always do after the image is completely colored in. Why? Lo, if you know me at all, it's to hide any little stray colors that may have escaped the lines and to give the stamped image a bit of dimension.

I've been in awe of my fellow DT sisters ability to color hair, something that I at times still have trouble with especially showcasing the highlights. I LOVE red, seriously love it, but coloring red hair scares me, lol. And just like any other time when I first colored the hair, this image almost went into the trash. I've learned though to walk away, let the ink dry and then come back and 'play' with it which I did. Not perfect by any means - I often wonder if I'll ever get that highlight thing down - but she was definitely a keeper :-). (oh in case you wonder why I don't give specific copic colors used - because I use so many different colors that in the end I stop keeping track).

Because the red, orange and yellow copic ink bled into the flowers, I used my Pitt Artist pens to color these in and then 'hid' any bleeds by adding the rhinestone stickers. To fill in the background, I used a watercolor pencil in a dark yellow and then blended it with a blender pen. Now to my mistake, lol.

I've learned from experience to always squirt out the first dollop of stickles onto scratch paper because it never fails that a whole big glob of stickles will explode out of the nozzle. Well, I wasn't going to waste this glittery blob so I grabbed a paint brush and painted it on.


Honestly, I love it. At first I didn't think the glitter would be visible, but it really does show up nicely. And using a paint brush allowed me a little more control. Especially since I used a sturdy bristle brush.

I used some scrap wired ribbon. Curled the ends with my metal 'curlers' from Boye (from my quilting/doll sewing days) and tucked the ends underneath the image panel. The green fiber tissue was from a gift package, can you believe that? I'm so glad I kept it because that color green is perfect and adds a nice texture. Added a couple more rhinestone stickers and then decided to use the the square Edgar Allen Poe sentiment from Plate #1 - . Because I didn't pre-plan my card, the full sentiment was too large, so I just cut the word Dream out and framed it on the brown oval card stock. Oh and I just had to give that cute bunny a fluffy little tail :-)


Here's a another look at the final card:

I hope this inspired you to just experiment. With copics, with watercolors, pencils, glues, you name it. Sometimes the best results come from mistakes.

Sunday, December 13, 2009

Connie-Mysterious Sweet Pea

This Luna Lights background just cried for this Sweet Pea Saying.

Supplies:
Sweet Pea Stamps Plate #1
Luna Lights paints by Stamp Oasis
Spellbinders Nestabilities Scalloped Squares
Versamark by Tsukineko
Detail black embossing powder by Judi-Kins
Vintage  dye ink pad "Gardenia" by Ranger
sponge
Black sheer ribbon by Offray
Glossy cardstock (unknown)
Purple cardstock (unknown)
Corner rounder punch by Creative Memories

*TIP:  to make this background you squirt some Luna Lights paints on a piece of glossy cardstock and lay another glossy piece over that (glossy sides together).  Press down on top piece and twist as you remove it to get 2 pcs of gorgeous backgrounds*

Layer background pc. over base after rounding corners and attaching ribbon.  Stamp verse on scrap of cream cardstock and emboss; cut with Nestie and sponge dye ink around edges using cutout as template.

Connie

Thursday, November 19, 2009

Connie-Sweet Sweet Pea Mermaid

Here is that famous Sweet Pea Mermaid....morphed a bit.  I drew some more locks of hair to
cover her a bit more, think they blend in well?

Supplies:
Sweet Pea Stamps Plate #1
Papers by DCWV "Safari Chic"
Nestabilities "Labels Two"
Prima Flowers
Glitter Brad by Oriental Trading
Dye Ink by ColorBox Chalk "Amber Clay"
Versamark by Tsukineko
Black detail Embossing Powder by Judi-Kins
SU Markers
Skittles from Holley
tiny jewel-unknown
Brown and white cardstock - unknown
glue dots

I trimmed some DCWV paper to fit base and edged with a marker.  I stamped, embossed and colored the mermaid before cutting with a Nestie; then I sponged ink around and layered on a larger shape.  I stuck a brad in the center of a prima flower and attached before adhering the mermaid to the card.  I attached a teeny tiny jewel to her belly button and some cool skittles that I got in a trade from Holley.

I drew in more tresses to keep my art out of the "adult" category...LOL  Hope you like it.

Connie

Monday, November 2, 2009

Feeling the Sun

Today we welcome Micki Harper to our design team as a full fledge member. We hope you enjoy her designs as much as we do!


It's my first official post as a full fledged Sweet Pea Stamps designer, yipee! I enjoy working with images that stretch my creative mind and help me grow. So I had no problem playing with this beautiful mermaid from Plate #1.

She is stamped onto Neenah Millstone cardstock with Memento Tuxedo Black ink, then colored with Copics. I had this vision of creating waves out of vellum, but it just didn't quite come out the way I envisioned it, lol! (Doesn't that happen to all of us? or is it just me?)

I decided to try to create the illusion of water and waves by using white vellum card stock which I embossed using Fiskars Texture Plate "Ocean", I then used Copic marker BG13 to emphasize the waves. Next I cut 2 slits in the waves with a kraft knife and attempted to make the mermaid appear as if she was half submerged in water with her tail coming back out of the water.

Here is a close up:


I needed to 'frame' the vellum (to hide the glue dots along the edges), so I got out my Sizzix Die "Jelly Frame" to create the frame. I used a clear epoxy sticker from Cloud 9 as my sentiment and added some gemstones for some sparkle.


The finished cardsize is 5x7, which allows me to be a little more creative.

Saturday, October 24, 2009

Playing with clay

Getting ready for the Holidays, these are two of the projects I have made for gifts.


This 'Roman Artifact' pendant was made using Sweet Pea Plate number 6 and Sculpey Clay. It is a quick and easy project to make as a gift for that special person. Full directions can be found at Stamper's Quest.


Another fun project to make is the Mermaid in the Shell, also made with Sculpey, Sweet Pea Plate number 1 and an assortment of treasures it is sure to please the toughest recipients. Directions can be found here.

Wednesday, July 8, 2009

Dreaming of the post office!


I am having a fight with my post office. Seems every time they see me now, they purposely FEEL for embellishments so they can charge me more. This card is flat as a pancake; lets see how they respond to it.

Can you believe this is really 2 scans of the same card? My scanner is crazy! It will either fade out the color, or make a totally new combination. Wonder if I could learn to use that to my advantage?

Directions :
1. Stamp sentiment and create two borders, each one 1/4 inch larger
2. Cut first background paper 2 1/2 x 3 1/2, or a size that balances the size of your chosen image. Layer once with background 1/4 inch larger
3. Create central stripe and back it with background 1/4 inch larger
4. Punch dots of various sizes and layer -- for ONCE the post office won't make me pay extra. I attached mine with scotch glue. You COULD put a brad in each which would be lovely but my post office would see that as a fat packet.

Card by cat gondek

Wednesday, July 1, 2009

Dream dream dream ...


  I just love using that undersea vegetation stamp and here it is used as a corner even though it stands on its side.

1.  Stamp dream twice, follow your dream and sea vegetation in white craft ink on dark paper. Let dry.
2. Color lightly with chalks or markers in just a few spots.
3. Mat with narrow green at center and larger pink on sides. Add ribbon and brads.


Sample by Cat Gondek

Thursday, June 11, 2009

Kaleidoscope dreamy mermaid


This is a fun way to use the wedge design of the Dreamy Mermaid stamp -

1... Stamp image 8 times
2.  Fold a paper in quarters and then fold it once more to get a pattern for your 8 wedges.
3.  Position your paper till you like the placement on the stamped image and cut out 8 of them
4.  Color images with colored pencils
5. Arrange in a circle. I put double stick tape on a punched circle of cardstock to help in arranging the wedges
6.  Mat and embellish

card by cat gondek


Wednesday, June 10, 2009

No one can rain - again


This card uses the splitcoast sketch challenge # 232 - and the spattered background and metallic ink backgrounds from before.  I made it from scraps by my paper cutter.


sample by cat gondek

Tuesday, June 9, 2009

No one can rain


I love this stamp for a cheer-up card plus it was great fun with a new technique I have been playing with from my latest technique junkies newsletter.

Inside text could be computer generated or hand written and my card says " Except Mother nature. She can rain on anything she wants ! "  I was thinking of incorporating my mermaid stamp as Mother Nature but that may have to wait till tomorrow.

1.  Drop some metallic craft paint into a coke can and add a few drops of water.
2.  Splatter over your white cardstock and let dry
3.  Stamp and mat your text
4. Use your paper punch to add interest and to create 2 tabs over your matting.


card by cat gondek

Monday, June 8, 2009

Butterfly Thank You Card


Supplies:


Butterfly Thank You Stamp
Brilliance Ink Pads (Tsukineko)
  • Platinum Planet
  • Galaxy Gold
  • Cosmic Copper
Black Card Stock (Bazzill)
Bravissimo Verdi Gris Vellum (Emagination Crafts)
Metallic Card Stock (DCWV)
Ultrafine Clear Embossing Powder (Ranger)
Double Sided Tape (Provo Craft)
Sticker Maker (Xyron)
Glue Stick (Scotch)
Ribbons (Unknown)
  • Light Green 1/2" Wide
  • Dark Green 1/4" Wide
Heat Gun (Marvy)
Scissors (EK Success)

Instructions:

  1. Stamp the butterfly image one time with each of the three colors ink on the vellum. Coat with embossing powder, remove excess and heat to set.
  2. Cut away the border of the gold stamped image leaving the center.
  3. Cut out the butterfly from the platinum stamped image.
  4. Layer the three images with the copper image on bottom, the gold in the middle and the platinum butterfly on top being careful to align each image neatly.
  5. Cut a 3.25" x 3.25" square from the metallic card stock and mat the stamped image on top, centering.
  6. Cut the black card stock to 4.25" x 11" and fold to 4.25" x 5.5" card.
  7. Position and adhere the matted butterfly image on the card front, positioning the card to lay with the opening at the bottom.
  8. Run the .5" ribbon through the sticker maker and attach to the left side of the stamped image, centering in the open area.
  9. Tie a knot with the loose ends of the dark green ribbon and cut open the loop in the center. Run the glue stick down the back of the dark green ribbon and attach on top of the lighter one, centering.
  10. Enjoy sharing!

Happy Birthday Card


Supplies:


Sea Goddess Stamp
Daydreamer Stamp
Happy Birthday Stamp
Black Versa Fine Ink Pad (Tsukineko)
Blue Card Stock (Bazzill)
White Cardstock 4.25x5.5 (Unknown)
Double Sided Tape (Provo Craft)
Foam Tape (Miss Elizabeth)
Glue Stick (Scotch)
Water Color Pencils (Stampin' Up)
Stickles - Icicle and Gold (Ranger)
Brads (Unknown)
Water Brush (Unknown)
Petite Mulberry Paper Flowers (Prima Mktg)

Instructions:

  1. Stamp the mermaid images on white cardstock and trim neatly.
  2. Color the images using a pink and yellow for the torso and arms, blue green for the tails and dark green for the fins, yellow for the hair and brown for the rock.
  3. Cut a piece of white card stock to 4" x 5.25", using the water color pencils fill in the paper with a light brown up to about 2" from the bottom and then go back over the area with some dark brown.
  4. Above the brown, fill in 1" with two or three shades of blue.
  5. Next add a sunrise to the area above the water that stretches up about an inch, by starting with a yellow. Layer orange and red on top.
  6. The remaining area of the white card stock should be colored in with blues, beginning with a light blue above the yellow and ending with a dark blue along the edge of the paper.
  7. In the area where the blue and yellow meet in the sky, add some purple.
  8. After the paper has been colored, go over the colors with a water filled brush, using the water sparingly. Allow to dry.
  9. Using the water brush, blend the colors on the mermaids. Allow to dry.
  10. Once everything is dry, add the brads to the corners of the background paper.
  11. Cut the blue card stock to 4.25" x 11" and fold to 5.5" to create a card base.
  12. Attach the back ground paper to the card front with double sided tape.
  13. Attach the Daydreamer mermaid to the back ground paper with the glue stick, positioning her to the left along the upper area of the brown.
  14. Using the foam adhesive, attach the Sea Goddess image on the card front on the right side overlapping the Daydreamer image slightly.
  15. Add Prima flowers to the the neckline to create a lei, on the Sea Goddess and place small dots of gold Stickles to the flower centers.
  16. Lightly squeeze gold Stickles out of the tip of the bottle and dot the brown area of the painted paper.
  17. Place small dots of the icicle Stickles randomly to the top of the back ground paper in the blue area. Allow everything to dry.
  18. Stamp the "Happy Birthday" image to the left side of the card above the Daydreamer mermaid.
  19. Enjoy Sharing!

Friday, June 5, 2009

One layer mermaid


Here's the Daydreamer mermaid again, this time for a one layer challenge over at splitcoast.

1.  Punch circle to mask sun; place on corner and brayer tap using a multi color stamp pad.
2. While your brayer is inked, mask the edges and create a 1/4 inch border
3. Stamp image and color with markers
4. Stamp image on acetate, turn over and rub ink under original image to create reflection; color it lightly.
5. Sponge in the sky using a cotton ball or cosmetic sponge; sponge in the water using circular motions, color in the sun. You can outline it with a black gel pen to make it coordinate with the black lines of the stamped image.

Wednesday, June 3, 2009

Reflecting Mermaid


This lady has a lot to think about, as she sits and holds her head.  To get her reflection, follow these steps:

1.  Stamp Daydreamer mermaid above the center on your white cardstock.
2.  Stamp mermaid again onto acetate. I used versafine quick dry pigment ink.
3.  Position  your stamped acetate image under the original and rub your finger on the back to transfer the ink. The color will be somewhat muted.
4.  Color your main image with bold colors and your reflection with the same colors but lighter tints.  Use a lot of white space and horizontal lines to give the illusion of water and waves.
5.  Accent your work with clear dimensional lacquer. I used crystal effects.

Inside text could certainly be Thinking of you, or Missing you, or even the cute Sweetpea stamps that says D R E A M ...

Sample by cat gondek

Feeling under the water?


This Daydreamer mermaid get well card was fun to make -- my mermaid is holding her own piece of kleenex and has a red runny nose. Poor baby, she also has her box of tissues sitting just below the rock where she is trying to get some rest.

1.  To get her to hold the kleenex, use your smallest punch and punch a row of 3 dots at her hand.
2.  Poke the corner of a piece of tissue through the hole and secure with tape from the back.
3.  Kleenex box is a square with left top and bottom right diagonal corners snipped off.
4.  Draw lines on the back connecting diagonals to see where to cut and create your box.
5.   Mount the pieces on a contrasting color leaving a margin of color showing through.
6.  Cut with a scant 1/8 inch border.
7.  Mount that on a punched circle or 2.
8.  Dimensionally mount on the corner of the cardstock.

Inside text ideas .... Feeling under the water? Hope you feel on top of things soon.

Or ... ( my personal favorite ) Nothing magic, nothing fishy --- Just a little get well wishy.

Sample by cat gondek

Sunday, May 31, 2009

Mysterious Daydreamer

This card uses Walnut Ink Daubers, these can easily be substituted with Bingo Daubers for the same effect.

Supplies:

Daydreamer Stamp
Einstein Quote Stamp
Black VersaFine Ink Pad (Tsukineko)
Teal and Leaf Green Walnut Ink Daubers (Fiber Scraps)
White Cardstock (Unknown)
Verdigris Bravissimo Vellum (Emagination Crafts)
Moss/Verdigris Printed Paper (Fiber Scraps)
Double Sided Tape (Provo Craft)
Gloo (Ki Memories)

Instructions:

1. On white cardstock stamp the Daydreamer image in black ink and trim out neatly.

2. Cut a piece of white cardstock 2.25"x 2.5" and stamp the Einstein quote, centering.

3. Cut a piece of the Bravissimo paper 2.5" x 2.75" and attach the quote image, centering.

4. On the white cardstock, randomly add color using the daubers by pouncing them all over, use a bit of force to allow for the splash look.5. Cut a piece of the printed paper 4.25" x 5.5" and tear off a 1" strip along one side of the long edge.

6. Cut a piece of the colored cardstock 1.5" x 5.5" and attach to the back of the printed paper along the torn edge with the double sided tape.7. Add some color to the corners of the matted quote image with the daubers and attach to the printed paper, positioning it about 1" from the top and .25" from the right hand edge.

8. Attach the Daydreamer image with Gloo, overlapping the tail onto the quote image. She is positioned about .25" from the left hand edge and 1.125" from the top of the paper.

9. Attach the card front to a 4.25" x 5.5" card.

10. Enjoy sharing!

Sea Goddess Thank You Card


This is a quick and simple card to create.

Supplies:

Sea Goddess Stamp
Thank You Stamp
Black Versa Fine Ink Pad (Tsukineko)
Moss/Verdigris Printed Paper (Fiber Scraps)
Cardstock Sticker (Deja Views)
White Cardstock 4.25x5.5 (Unknown)
Double Sided Tape (Provo Craft)
Gloo (Ki Memories)
Yellow and Gold Decorated Chalks (CTMH)
Copic Markers G94 and BG93 (Imagination)
Peach Glow and Blush Photo Twin Markers (Zig)
Ginger Adirondack Marker (Ranger)

Instructions:

1. Stamp the image on white cardstock and trim neatly.

2. Color the image in using the Peach Glow marker for the body and face, the Ginger marker for the seashell, the darker Copic marker on the fins and the light Copic marker on the tail. For the hair, blend the chalks and lightly brush all over. To finish, add a touch of color, using the Blush marker, to the lips and cheeks.

3. Cut the printed paper to 4.25" x 5.5" and adhere to the card front with the double sided tape.

4. Cut a 5" piece of the cardstock sticker and attach to the left hand side of the card front about .5 inches from the edge. Add a bit of the double sided tape to ensure it stays in place.5. Attach the Sea Goddess image to the card front, centering in the remaining open area of the card front and stamp the "Thank You" image above her open hand.

6. Enjoy sharing!