
 Hi everyone! It's Angela here and I wanted to share with you a tutorial on how I mount my plain raw rubber Sweet Pea's. First I cut out all my images then I turn them upside down. I did all my newest images outside as the weather was just too pretty to stay inside.
I use Aleene's 'TACK-IT' Over & Over glue. You can purchase it at Michaels that's were I got mine. You can probably find it on some on-line stores. I know Joann and Hobby Lobby carries the Aleene's glue but NOT the TACK- IT Over & Over glue. And that's what you need. Just to warn you this glue is VERY, VERY sticky. So keep a wet rag handy. Make sure you shake the glue up GOOD or it will be watery.
 You will need a brush to apply the glue over the rubber. Any small to med. paint brush will work.
 I just squeeze a small amount on the back of my stamps and brush all over the rubber, you may need to add more glue or less depending on the amount you need.

After you have applied the glue all over in even coats let them dry for at least an hour or longer just to make sure they are completely dry. When dry they will be sticky and you can attach then to your acrylic blocks if you want to stamp right away or they are ready for storage.
 You will need a brush to apply the glue over the rubber. Any small to med. paint brush will work.
 I just squeeze a small amount on the back of my stamps and brush all over the rubber, you may need to add more glue or less depending on the amount you need.
After you have applied the glue all over in even coats let them dry for at least an hour or longer just to make sure they are completely dry. When dry they will be sticky and you can attach then to your acrylic blocks if you want to stamp right away or they are ready for storage.
And I am going to show you what I use to store them on/in.

I use these clear plastic storage containers called Scrap Onizer's. I purchased mine at Unity Stamps but you can Google them and find them at other places. This was the cheapest place I found them at. You will also need to purchase the clear folders to attach them to. They come just like any other folder, but to get the best use out of them I cut them in half where they bend over. That way I have 2 pieces and I can lay them on top of each other. Here is a picture of one of the folders before I cut it in half.
 After I have cut them in half they are ready to be attached to the clear folder and ready for storage. When you want to use one, just pull it off the folder, stamp, clean and stick back.
Here's a picture to show you where I started sticking my stamps to the folder. And you can see glue where the light is hitting the dry glue.
 I turned the folder up side down to show you they are stuck and not going anywhere.


I also use the bottom of the storage container and stick some of my stamps to it. As it is made out of the same stuff. Then you can just start stacking up the folder halves on top of it.

Here is a picture to show you the container from the side. They are only about an 1" to 1.5" thick and can be stood up like a book. I have tried alot of different way's to store and attach my plain rubber stamps and this is by far the best to me that I have tried. I even use these container to storage my foam mounted rubber stamps. These storage containers works great for both. And the Aleene's TACK IT Over & Over glue is under $5 a bottle and this bottle goes a long way.
 I turned the folder up side down to show you they are stuck and not going anywhere.

I also use the bottom of the storage container and stick some of my stamps to it. As it is made out of the same stuff. Then you can just start stacking up the folder halves on top of it.

Here is a picture to show you the container from the side. They are only about an 1" to 1.5" thick and can be stood up like a book. I have tried alot of different way's to store and attach my plain rubber stamps and this is by far the best to me that I have tried. I even use these container to storage my foam mounted rubber stamps. These storage containers works great for both. And the Aleene's TACK IT Over & Over glue is under $5 a bottle and this bottle goes a long way.
Well I just wanted to show you how I store my stamps and how I attach them to my acrylic blocks for stamping. I never have to worry about losing a stamp either and I can see through the containers. I also take a marker and write the stamp company on the spine of my containers. Here is a picture of how they look stood up on my shelf.


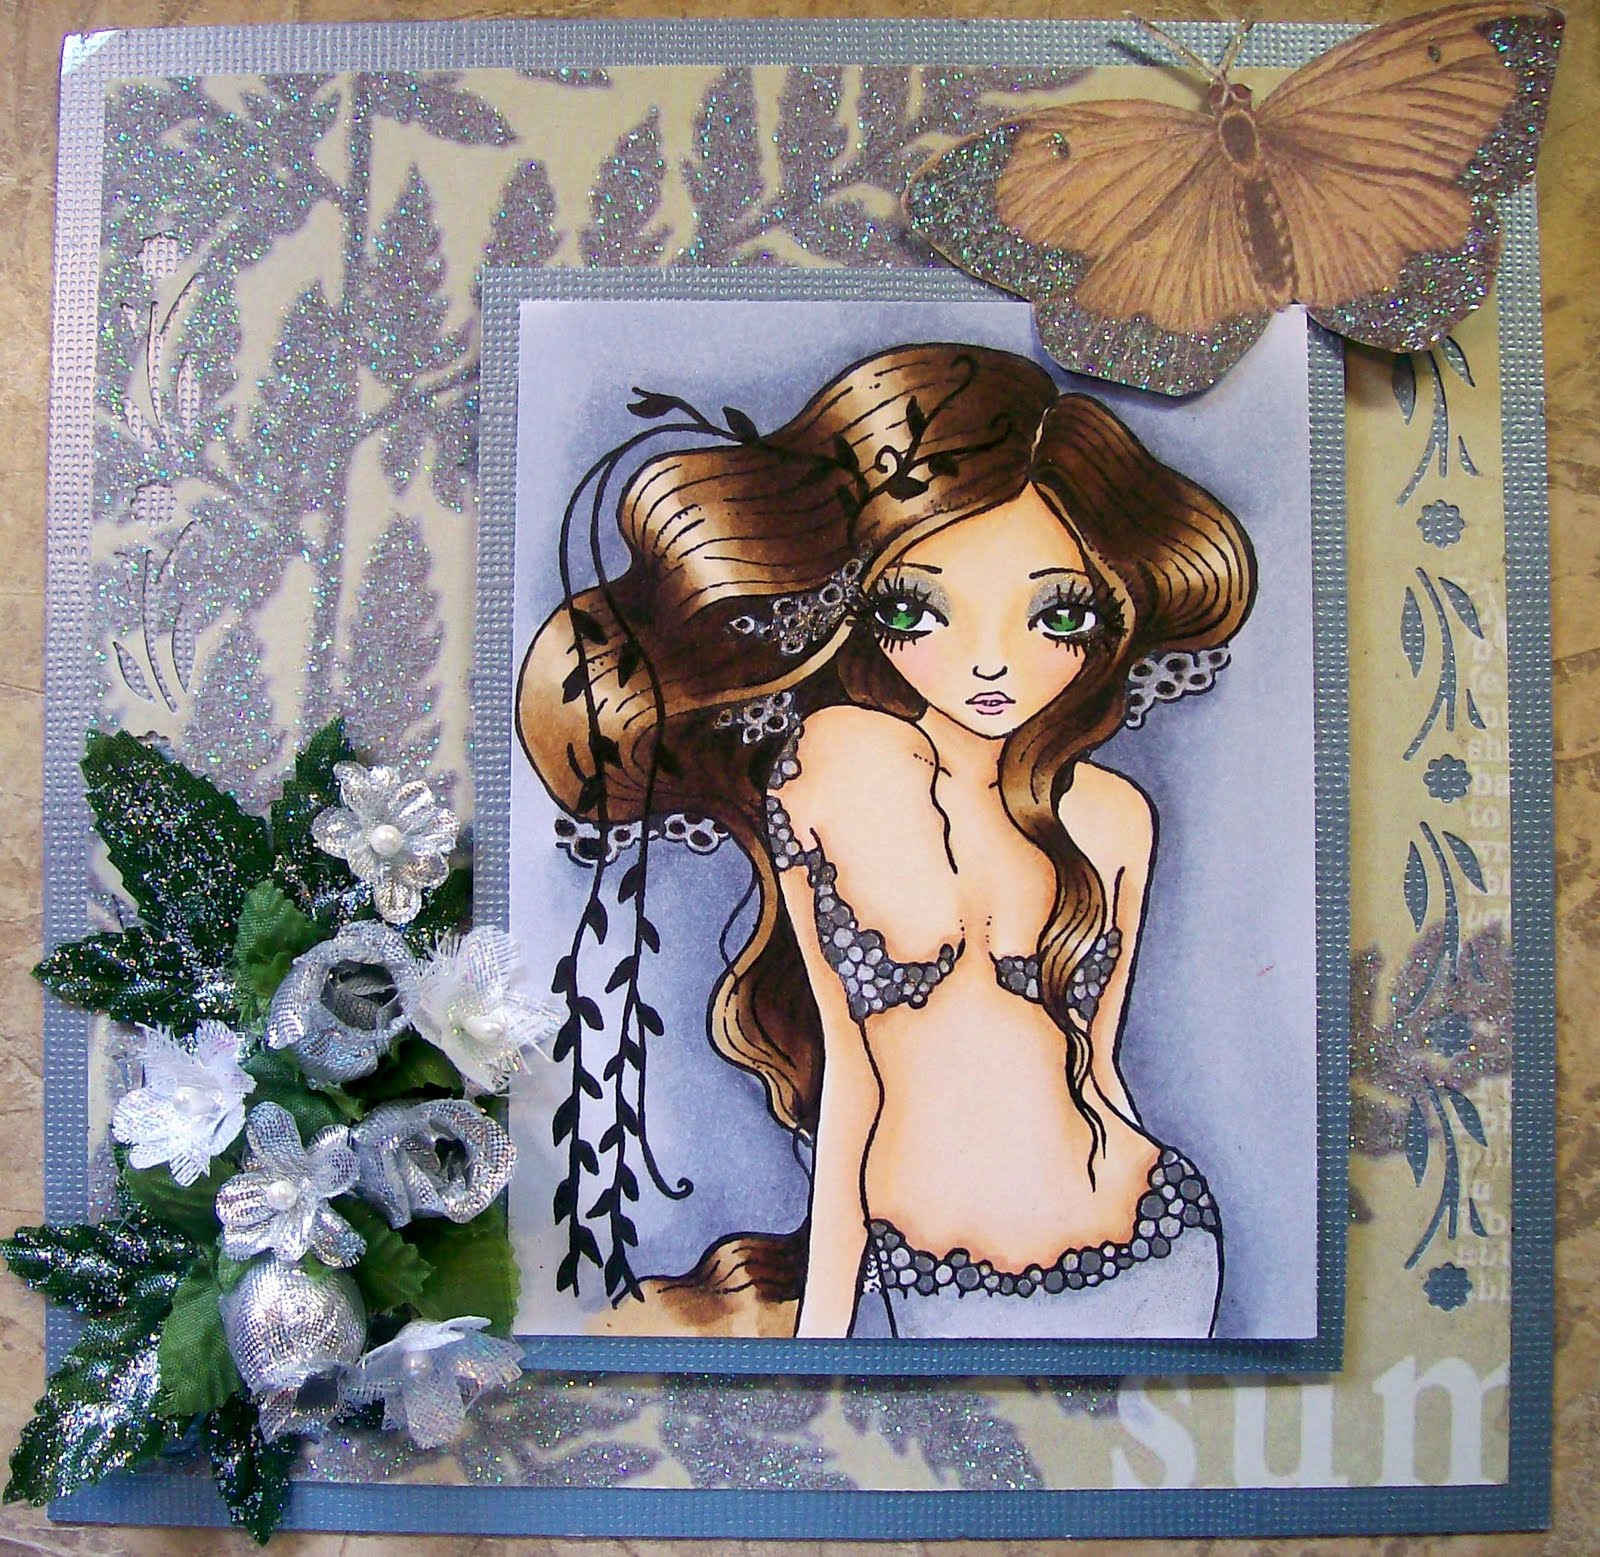 Today I also have a card to share that I colored last week and finished this week. I used Enchanting Gold by ching-chou kuiks fantasy art collection at Sweet Pea Stamps (plate #41).
 Isn't she jsut beautiful? I get lost every time I color on of these images. Just the way they start to come to life. This is a pretty big image and I had so much fun with her.
Supplies:
Stamp- Enchanting Gold by ching-chou kuiks for Sweet Pea Stamps(Plate#41)
Ink- Memento Tuxedo
Paper: Image was stamped on Neenah Solor Crest, Metallic CS, DP- can't find at the moment
Accessories- Butterfly was cut out of the same DP, Leaves and flowers came from Hobby Lobby's Wedding Department, foam tape, added glitter glue to the flowers and leaves
COPICS:
Skin- E02,E00,E000,E50,E51
Hair-E49,E47,E57,E35,E53
Clothes: C0,C1,C3 and I went over it with a clear Sakura pen
Background- C5,C3,C1,C0

That is so clever and space saving! Thanks for the great idea, will have to look if there are any of those folders around in the UK.
ReplyDeleteAbsolutely love your card, your colouring is PERFECT her hair looks real!
Sarah x
Awesome collection of Sweet Pea stamps lol! Your card is just stunning, such lovely colouring, love the highlighted hair and all your gorgeous sparkle, take careX:)
ReplyDeleteabsolutely stunning. Love how you coloured her hair.
ReplyDeleteThanks Angela for your time. You are awesome.
ReplyDeleteBeautiful card Angela and that is how I store my stamps too. Love that tack it over and over stuff :-)
ReplyDeleteSo much easier than mounting them! Thank you for the tip! Love the stunning card.
ReplyDeleteHugs
Tanya
What a great idea! I'll be on the lookout for that glue! Never heard of it but now it's a MUST HAVE! Thanks for the tip! xxD
ReplyDeleteOnce again thanks for the tip Angela!! Your artwork is marvelous!
ReplyDeleteInteresting your tip !
ReplyDeleteand your card is juste fabulous !
Hugs !
fantastic tips and hints here..what a great way to store your stamps not sure the glue is available in the UK..also may i ask that you do a post about the inks you recommend for the stamps
ReplyDeleteThat's a great idea to use that glue for stamps!
ReplyDeleteI always thought that the plain rubber stamps needed the foam on the back to give a bit of ease, to help get a good impression. I'm assuming everything stamps just fine without foam? Do you stamp on a soft or hard surface?
Wow! Thank you so much for this tutorial on storing stamps. It was so helpful!!!!
ReplyDeleteScrummy image and beautifully coloured :)
ReplyDeleteWowzers! I love your card, she is gorgeous. Your storing technique is great Angela, thanks for sharing.
ReplyDeleteBeautiful card, Angela! Thanks so much for showing how you organize your stamps! :-)Traci
ReplyDeleteShe's beautiful! Gorgeous colouring!
ReplyDeleteThanks so much for the hints and tips too!
Arabella
Wonderful card Angela, as usual !!! Thanks for sharing your storage idea with us, this is a big great idea !!!
ReplyDeleteHugs
Mag :)
I also have to thank you for the tip. I have also, as many others, always used ezmount with my stamps.
ReplyDeleteYou make amazing cards!
thanks for sharing your tip, love the card it is gorgeous
ReplyDelete