Hello everyone! Wow, I feel like I'm just about fully recovered from the holidays! Hope everyone's New Year is off to a great start!
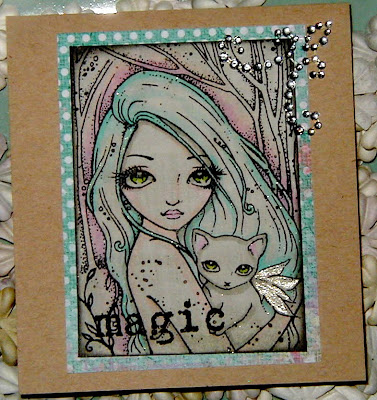
Today I have a tutorial featuring the image "Purple Woods" from Ching-Chou Kuik's Fantasy Art Collection, Sheet #4, plate #24.
This is a variation on the color wash technique and I call it the 'newspaper color wash'.
NEWSPAPER COLOR WASH TUTORIAL:

Stamp your image and then cover the entire image in a grey shade. Here I used Copic Markers in W00 and W3. I put down 2-3 layers of W3, then a layer of W00. You can repeat this to saturate the paper even more. This would work with any of the W shades from W00-W3 and probably any of the C, T, or N shades of grey.
 While your coats of grey are still wet start adding your color. Be sure to add your color with a light hand. The key is to have a lot of the grey show through. Sketch or Ciao is best to get the light, brush strokes. Here I added a touch of BOO to her hair.
 I then added some BG01 to shade/darken some of the areas I colored with BOO.
 Next, I outlined her skin in R01 and colored the eyes in YG03, YG23, and added some RV02 to her lips and the fairy cat's ears.
To add a little more color, I used V12 and YR000 around her. I used the V12 first and then blended out with the YR000 to give it a slight glowy appearance.

I then took my favorite grey, W3 and added some shadows to the fairy cat and other areas that need a deeper shade.
 Once I was done with my Copics, I added some Spica glitter pen in mint to her hair and used a Sakura Clear Stardust pen on the fairy cat's wings. I also edged the image in Versamagic Midnight Black.
This technique is fast and fun! There are so many variations. You can lay any light color down first for a color wash.
Hope you enjoyed the tutorial!


Thanks for sharing Randi, your card is just amazing !!!
ReplyDeleteHugs
Mag :)
cool tech thanks for such great detail!
ReplyDeleteI love the outcome of this look, very pretty, Randi. Now I wish I had the time to try it. You amaze me with all your techniques.
ReplyDeleteWow this is so pretty! Thanks so much for the tutorial, I am definitely going to try it. Did you use regular white card stock to begin with? I'm a bit unclear about adding the lighter W over the darker one, but probably when I go to do it I will see what happens.
ReplyDeleteThis is a great tutorial. I've never tried this technique but wow, what a great result. I really love that card......
ReplyDeleteOH I need to get some of these stamps!!! I saw one on traci's blog and fell in LOVE wow....
ReplyDeleteGreat tutorial.....Love that Look!
Thanks again for the tutorial Randi!! I just love all the cool techniques you have been creating with these beautiful images!!
ReplyDeleteHugs,
Angela
Thanks for the tutorial! that's great.
ReplyDeleteWOW! Stunning work. Thanks for sharing the "How to" with us.
ReplyDeleteHugs
Tanya
I love this Randi! I am definitely going to give this a try.
ReplyDeleteThanks for sharing.
Connie
Thanx for a fab tutorial Randi,will i get the same effect using promarkers? as i havent any copics.
ReplyDelete(hugs)
Trish (-:
Love what you have done with this stamp
ReplyDeleteTeresax
Thanks for the sweet comments everyone!
ReplyDeleteEtha, yes, I used white paper. I completely colored over the image with my broad tip with W3, and then applied a second coat of W3. Then I went over the again with W00. It lightens it up a little and gives it more texture, so it's not just flat grey. If you want your paper more saturated. Repeat a layer or 2 of the W3 and then a layer of the W00.
Diamond Doll, I am not sure about Promarkers as I have not used them yet. If they tend to stay wet, it should work. If they are dye-based and dry fast, it probably won't work as well.
Hope that helps. Feel free to ask more questions!
Fabulous tutorial. I'll need to try that. I love all the Copic grays.
ReplyDeleteYour final card is stunning!
I love all the information shared here! Thank you!! Gorgeous creation- just gorgeous!
ReplyDeleteWhat a great technique- thanks for sharing this tutorial.
ReplyDeleteThat is stunning!
ReplyDelete