Saturday, July 7, 2012
Customer Submission Week
begins Sunday - forward your Sweet Pea creations to jennifer.
 design team member for Sweet Pea Stamps, Fairie Song Stamps, The Frantic Stamper and Painter for Third Coast Rubber Stamps.
Tilla
This is the lovely Tilla. She is a creation of Terra Bidlespacher for Sweet Pea Stamps and is part of Plate #209. I colored her without selecting background papers or having any plan first. That is not how I normally do things so I am quite happy it worked out. These papers from the Basic Grey PB&J collect happened to go perfectly!
Get Inky!
Alex
Labels:
Alex,
Plate #209,
Terra Bidlespacher,
Tilla
 I live in Idaho with a great hubby and two sons. I love the fiber arts and papercrafts. I have started running and recently completed a FULL MARATHON. If you want a glimpse in to my life, this is the place for you. Hope you enjoy your time.
Friday, July 6, 2012
New Release! Elisabeth Bell
Now available for pre-ordering, Elisabeth Bell's:
Beach Ball Baby:
Jack-O-Lantern Tea:
Sweet Incorrigibilty:
more details on websiteStunning Stamps from Anna Marine
Here's a couple of creations to share today from Sweet Pea artist Anna Marine. The first one is a stunning image called Gates to Eternity. This angel image is totally amazing! She is sold by herself or on plate #207 with several other great images.
This image from Plate #141 and is called L.O.V.E. All I can say is WOW, isn't that what you wanna give your love? She's decked out in a black nightie with skin toned tights on. That would make every hubbie go "Oooo la la!" I added some wonderful heart fringe on the sides of the card and some bling. I used a wonderful Sweet Pea stamps saying "Have a Magical Day"
Here's a closeup of the image as I colored it. Can you imagine if you put this card in your husband's lunchbox (i.e. brief case, ....) and then had that outfit later on?
This artist has some wonderful images, both some very pretty and elegant style and some very sexy and romantic style. Check them all out. And while at the Sweet Pea store, check out the current sale.
Cheers, Holley
Labels:
Anna Marine,
Gates to Eternity,
Holley,
L.O.V.E.,
Plate #141,
Plate #207
 Child of God, wife of John, sister, aunt, Paraprofessional , Electrical Engineer, LabVIEW Programmer, and most of all lover of Crafts!
I am a Rubber Stamper, Scrapbooker, Cardmaker, and jewelry designer.
Thursday, July 5, 2012
Fairy Wall Hanging
Today I would like to share a little wall hanging I made. This image is so adorable - you'll find her in the Lisa Victoria collection.
Fairy Wall Art
Finished Size: 8 x 9.75"
Supplies:
Stamps:
Bubble Fairy from Lisa Victoria
Inks:
Jet Black StazOnInk Pad (Tsukineko)
Paper:
Heavy cardstock (Unknown)
Other:
Dominoes (Unknown)
Colored Pencils: (Derwent)
Blue
Green
Purple
Foam Mounting Tape (Scotch)
Omni Stick (Hammerhead America)
Foam Board (Unknown)
Blue Mat Board Scrap5 x 7" (Unknown)
Black Mat Board 8 x 9.75" (Unknown)
Heat Gun (Marvy)
2 Soda Can Pull Tops or Table Top Stand (Unknown)
Directions:
- Position six dominoes, blank side up, into a rectangular shape on a flat surface.
- Stamp the image with StazOn on the domino surface (centered) and allow to dry.
- Heat set image with heat gun.
- Color the image with pencils using the blue on the flowers, wings and bubbles.
- Using the purple pencil, color over the blue areas lightly allowing both colors to mix.
- Color the leaves green.
- Position the scrap mat board on a flat surface.
- Begin adhering the dominoes, starting with the middle piece, to the scrap mat board with the Omni Stick by placing a few drops on the back of each.
- Allow the adhesive to dry.
- Working with the foam tape, create a strip about 3" long, layering and adhering six additional strips to it, repeat three more times. (This will add dimension to the frame.)
- Attach foam tape to the back of the black mat board at a diagonal.
- Once the matted dominoes have dried, adhere the mat, centering the domino art in the window.
- To create a sturdy backing for hanging, cut a piece of foam board slightly smaller than the mat (about 7.75 x 9.5").
- Cut a piece of heavy card stock the same dimensions of the foam board and adhere to one side. (This will create a finished look to the back of the wall hanging.)
- Adhere the bare side of the foam board to the back of the wall hanging and allow the piece to dry.
- If desired, attach to pull tops from aluminum cans to the back of the wall art for hangers, otherwise a small table top stand can be used for displaying.
Labels:
Bubble Fairy,
gift,
Jennifer Willis,
Lisa Victoria
 design team member for Sweet Pea Stamps, Fairie Song Stamps, The Frantic Stamper and Painter for Third Coast Rubber Stamps.
Wednesday, July 4, 2012
Tuesday, July 3, 2012
Connie-Fans & Lily
Don't you just love these beautiful ladies by
Karen Middleton?
This one is called "Pink Lily" and
you can find her over at
I thought she needed no more
than my handmade fan and a few flowers.
What do you think?
Enough or not enough??
Corner die is by Memory Box and papers by
Anchor Paper.
Stardust Stickles on her wings for glitz and a tiny gem to dot
the "i" in the rub on phrase. I set a tiny fan I made from some scraps
of lace, sprayed with starch to stiffen and hold the pleats
over the corner diecut.
Below is a closeup view of my tiny fan:
Check out the bevy of beautiful babes over at
Thanks for stopping!
Connie
Monday, July 2, 2012
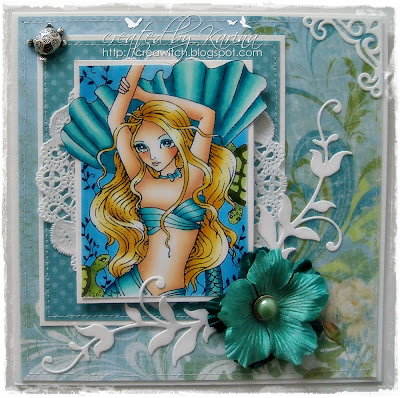
Green Turtle
Hi everyone, hope you are doing fine and the weather is that beautiful and sunny at your place on earth just like here where I am living. Because of this I wanted to create a card in refreshing colours. And one of the newest fabulous images 'Green Turtles' by amazing artist ching-chou kuik's is perfect for. You can find it on Plate # 208 together with three other beautiful imags, is available as single stamp as well.
I coloured the image with Copics. The papers I used are from BoBunny. Below you can see a close up of the image.
Thank you so much for looking, always much apprechiated. Wish you a magical day now.
Hugs, Karina
Labels:
ching-chou kuik,
Green Turtles,
Karina,
Plate #208
 in der Schweiz mit meinem Schatz und unseren drei Miezen wohnhaft, bin ich schon von Kindesbeinen an immer vom Basteln begeistert gewesen. Seit Jahren dem Stempelvirus verfallen. Immer neue Ideen im Kopf welche es gilt umzusetzen. Immer auf der Suche nach Inspirationen, welche man zuhauf findet in Blogland.
Sunday, July 1, 2012
Despair
Hi everyone. It's Angela and today I am back with another card using one of Rebecca Sinz's images.
The name of this image is "Despair" and you can purchase her as a single or on
with 3 other gorgeous images.
I really love this image, well all the images on this sheet by Rebecca Sinz are just as gorgeous as this one.
Here is a the image up close and colored with copics my favorite coloring medium.
I will try my hardest to list the colors I used at the end of this post. I can't remember all of the colors I used in the background as I used a ton of different colors until I achieved the look I wanted. And when I do that I always forget to write down my colors I used.
The leafy die is from Sizzix. I added some Wild Orchid Crafts Roses, The black bigger corner die in the right corner is from Sizzix and the smaller green one is by Quickut. I also added some BIG WIDE black lace behind the image and all some decorative Sprigs I found at Hobby Lobby in the Wedding Department.
Here is a list of the copics I used..
Skin: YR0000,YR000 and YR00
Hair: C00,C1,C4,C6,C8
Wings-N0,N1,N2,N3,N5,N7,C1,W1,W3 and W00
Dress: YG99,YG97,YG95,YG93 and G20
Ground: W00,W1,W3,W5,W7 and W9
Here are some the the colors I know I used on the background and the rest I just can't remember.
C1,C2,N1,N2,W1,W3,G000,G0000,BG0000,BG10
Sorry I couldn't remember the rest.
I hope you have a wonderful day and thanks so much for stopping by today.
Hugs:)
Angela
Labels:
Angela,
Despair,
Plate #205,
Rebecca Sinz
 I love all things crafty. Stamps and Scrapbooking are on the top of my list. I hope to share some of my love's in life with others. And to know that I'm not the only obsessed crafter out there. I have been married to my husband Bill for over 11 years. I have three children; my daughter Destiny(18),Son Bailey(11) and my youngest Jazmine(7).
Subscribe to:
Posts (Atom)


