Showing posts with label Jane. Show all posts

Wednesday, November 25, 2015

Jane presents Madison by Fernanda Oravec


Good morning folk, hope you are having a good day :) :) This week I am sharing a Christmas card with you using the cute image Madison by Fernanda Oravec available from Sweet Pea stamps in digi format.

To make this card I first embossed some tan card base and then layered with red.  For the front of the card I added some gold mesh to one corner.  The image was coloured with Polychromos and then fussy cut and a gold circle die added behind the head.  The label is a peel off sentiment layered on red and gold and to finish off several poinsettia flowers. Not a very fancy card but I do love the way it has turned out with all the layering and texture :)

Ingredients:-

  • Image - Madison by Fernanda Oravec
  • Colouring medium - Faber Castell Polychromos
  • Dies - oops, I can't remember
  • from my stash -  flowers, peel off sentiment and gold mesh


Sunday, November 22, 2015

Jane presents Peace Fairie by Karen Middleton

Hello everybody, hope you are having a good day :)  Time for me to share my Sweet Pea Stamps creation with you.  This card is for my youngest daughter, Nicole so fingers crossed she likes it :) I have used the image Peace Fairie by Karen Middleton which is available as a digi. Isn't she just beautiful and so very peaceful.

This is a pretty straight forward card, I wanted something more classy than funky this year for Nicole.  To begin with I cut and folded my card and then backed it with some Papermania paper from one of their Christmas packs.  The image was coloured with a mixture of Faber Castell Polychromos and Promarkers.  Once the image was coloured I then shaded the background with several shades of green chalks and mounted the image on plain dark green paper.  Next I mounted this on the holly paper which I have also used for the writing area inside the card and a bit more on the front. Finally I distressed the edges of the image mount.

Embellishing this card was hard, it seemed no matter what I did nothing was working so in the end I went down a simple path allowing the beauty of the image and some rather gorgeous trim I have to shine through.  

I have so old brads in my Christmas box and know I am never going to use them as I don't like the pictures on them so thought I would try something - can I recycle them hahaha.  A sharp pair of scissors quickly removed the image and plastic covering and miraculously the smallest of my Spellbinder circle dies was just the right size to use to make a new insert.  Using the same paper as I backed my card I then added my daughters name with peel off letter stickers along with a wee star as I often use the term 'you are a super star' :)  Next I glued this to the brad and added some dimensional Glossy Accents to re-create the plastic covering. Once died I had exactly what I wanted and this is something I think I will be doing a lot more as it is rather cool to have the large brads totally match the creation. 

 The inside of the card was finished off with an off-set writing area using the holly paper I also used on the front. The shape was cut using Spellbinders Labels 20. Finially I added a small spray of crystals and pearls plus a Christmas themed bow.


Ingredients:-
  • Image - Peace Fairie by Karen Middleton
  • Colouring Medium - Faber Castell Polychromos and Promarkers
  • Papers - Papermania
  • Dies - Spellbinders Labels 20 and Circles
  • From my Stash - ribbon, brad, peel off stickers, gold pen, pearls, crystals sprays, ribbon.
I am entering into the following challenges:-


Monday, November 16, 2015

Jane presents Lucy by Sandra Caldwell


Morning folks, hope you are having a great day so far :) :) Today I am sharing a card I have made using Lucy by Sandra Caldwell.  I first coloured the image with Polychromos and Promarkers.


Next I decided to go with dotty paper hahahaha, well this lovely lady does look rather dotty to me. To some of the red and white dotty paper I coloured the white spots black, me in a dotty spotty mood rather liked the idea of creating two design papers from one and the colours matched up perfectly lol.  The sentiment is a rubber stamp I have which I stamped onto one of my spotty dotty mounts and then mounted this on black, three black gems.  The other two mounts were made with my two variations of the paper.  I had the perfect ribbon to go with this card for my bow and also used along with the paper to finish off the inside of the card.

I wanted this to be a belated birthday card so hand wrote an apology sentiment - Sorry I forgot which I think ties in super well with the rubber stamped sentiment.

 Ingredients :-
  • Image -  Lucy by Sandra Caldwell
  • Colouring medium - Polychromos and Promarkers
  • Dies - Spellbinders-Grand Labels 1 
  • From my stash - ribbon and gems


Sunday, November 8, 2015

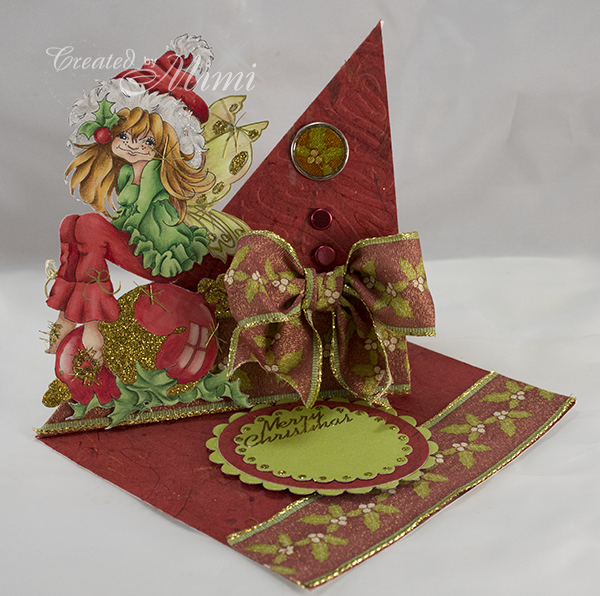
Jane presents Christmas Fairy by Karen Middleton


To begin with I coloured the gorgeous image Christmas Fairie by Karen Middleton available in ruber or as a dige, with Promarkers Faber Castell Polychromos.
Next I created my Swivel Easel card base and covered it with some wonderfully textured thick Mulberry Paper.  The top right side was embossed with a Christmas tree design, I wanted something that was not noticeable on the card until you really looked :)  The image was fussy cut which meant I cut off some of the star lines and also the lines around the feet so to replace these I used gold wire for the stars and dismantled a gold pipe cleaners as the small bits of tinsel were perfect for the feet area.

Recently I have used up brads that I have which I don't like by dismantling them and then using the smallest Spellbinder Circle die to cut the circle shape and Glossy accents to recreate the plastic covering.  For this die I used the holly ribbon for my circle inside the brad. To finish off a couple of strips of the holly ribbon and a big bow to bring everything together.
 To create the writing area for the card I used Spellbinders Ovals and Scalloped Ovals to form three layers.  A simple Christmas peel off sticker was perfect for the sentiment and some gold Stickles for a bit more bling.

Ingredients:-
  • Image - Christmas Fairie by Karen Middleton
  • Colouring Medium - Promarkers Faber Castell Polychromos
  • Dies - Spellbinders Circles, Ovals and Scalloped Ovals
  • From my Stash -  Mulberry paper, ribbon, brads, Stickles, pipe cleaner, gold wire and glitter.
I am entering into the following challenges:-


Wednesday, November 4, 2015

Jane presents Rosarna Christmas by Karen Middleton

Today I am sharing a Christmas card I have made for my sister using the stunning image Rosarna Christmas by Karen Middleton available from the store both in rubber and as a digi.  I made this card a wee while ago, well actually back in May lol as I took it to the UK with me and left it there for posting at the right time (save me trying to get cards sent from Saudi and ensuring they arrive safe and sound).  I have just mentioned that because I see one of the poinsettia flowers on the image is squiff and I can't take another picture to correct that - sorry folks).

To begin with I coloured the image with Polychromos and Promarkers.
I then made a couple of simple mounts and a sentiment mount layering up in greens, golds and some gold holly embossed vellum.  The image is so gorgeous I really did not want to overly embellish this card or add to much as everything I tried just made it look cluttered and distracted from the image.

Ingredients:-
  • Image - Rosarna Christmas by Karen Middleton available from Sweet Pea Stamps in rubber and as a digi
  • Colouring Medium - Polychromos and Promarkers
  • Dies - Spellbinders Grand Ovals and Grand Scalloped Ovals
  • From my Stash - Christmas sentiment peel off sticker, poinsettia flowers and brad

Sunday, November 1, 2015

Jane presents Janice Cullen's Fruity Babies Watermelon

 Hope you have had a great Christmas folks and are not too worn out after all the festivities :)  Today for my DT creation I am using Janice Cullen's Fruity Babies Watermelon available from Sweet Pea Stamps in rubber.

To begin with I rummaged through my stash of free papers from magazines which I seem to have to make a real effort to use as I always forget about them hahaha. I embossed my chosen paper with a butterfly folder and then mounted this on pink card to match the watermelon on the digi.  The digi, by the way, was coloured with a mixture of Promarkers and Polychromos.  Next I cut a die using Sizzix Frames Ornate Moroccan and added some green butterfly gems and lighter green flower gems.

The inside of the card was finished off with the remaining scraps of my design paper with a pink card Spellbinder lattice on top.  Nice an simple :)


Jane presents Christmas Bird by Elaine Cox


Morning folks :) today I am sharing a Christmas card with you using the lovely image Christmas Bird by Elaine Cox available from Sweet Pea Stamps in both rubber and as a digi.

To begin with I coloured the image with Polychromos crayons and Promarkers.

I next fussy cut the image and mounted it on a Tattered Lace Doily Flourish die.  Next I created my mounts both using the pale blue background card and then blue patterned paper.  The snowflakes were cut using Impression Obsession Snowflakes which I then sprayed with silver varnish from Crafters Companion. Next I made the sentiment using an Xcut die from the tags set, a peel off sentiment sticker and die cut holly leaves using the die Memory Box Small Holly Leaves.  A satin ribbon blue bow was added for a bit of contrast.
 The inside of the card was finished off with snowflakes cut using the paper I used on each of the layer mounts.

Ingredients:-
  • Image - Christmas Bird by Elaine Cox
  • Colouring medium - Polychromos crayons and Promarkers
  • Dies - Tattered Lace Doily Flourish die, XCut Tags, Impression Obsession Snowflakes and Memory Box Small Holly Leaves
  • From my stash -  ribbon, Stickles, peel off sentiment

Sunday, October 25, 2015

Jane presents Ching Chou Kuik's Holly Fairy


Good morning folks, hope you are having a good day :) For my DT creation today I have used the gorgeous image Holly Fairy by Ching Chou Kuik available in both rubber and as a digi from Sweet Pea Stamps.

To begin with I coloured the image with Polychromos.

Next I embossed a black mat and then mounted this on red.  Next was the red lace and then it was onto the die cutting :)  The trellis is a die by Cherry Lyn and the wee holly leaves are a die from Memory Box.  I then added red crystal gems to represent the holly berries.  Finally I added some red ribbon to cover the line of the lace edge and a bow with another couple of holly leaves and some more gems.
The inside of the card was finished off using the Tattered Lace Studley die for the red and Spellbinders circles for the white writing area.  Ah, almost forgot to mention, the last bit I did was to add a Christmas sentiment using Elizabeth Craft Designs - 745 Merry Christmas die


Ingredients :-
  • Image - Holly Fairy by Ching Chou Kuik
  • Colouring medium - Polychromos
  • Dies - Cherry Lyn Trellis,  Memory Box Holly Leaves, Tattered Lace Studley, Spellbinders Circles andElizabeth Craft Designs 745 Merry Christmas die
  • From my stash - lace, gems, ribbon, gold cord

Sunday, October 18, 2015

Jane presents Light Yellow by Karen Middleton


This week is Artist Week and the whole team are using images by the fabulous Karen Middleton.  Karen's images are so beautifully drawn and a dream to colour :) :) :) For my creation I am using the image Light Yellow which is available from Sweet Pea Stamps in both rubber and as a digi.

For my card I first coloured the image with Promarkers and Polychromos.

To make the card I covered some white cardstock with an olive green paper which has a gold fleck which I had embossed.  Next I added a a purple die cut using Spellbinders Victorian Medllion 3 and also used the small medallion of this die set for the yellow accent.  The purple mount and image which I had triple mounted were then attached to the card with foam taps so I had lots of height.
Next I created a bouquet of flowers from my stash, used some very fine organza ribbon for the bow which was finished off with a gold heart then added a die cut sentiment from Creative Expressions and finally a purple metallic butterfly.

Ingredients:-
  • Image - Light Yellow by Karen Middleton
  • Colouring Medium - Promarkers and Polychromos
  • Dies - Spellbinders Victorian Medllion 3 and Creative Expressions Just a Note
  • From my stash - flowers, ribbon, gold heart, butterfly, pearls

Sunday, October 11, 2015

Jane presents Voyager II by Lucy Loo of The East Wind


Hello folks, hope you are having a good day.  Today I am sharing with you another journal page using the image Voyager II by Lucy Loo of The East Wind available from Sweet Pea Stamps in digi format.  I had a really hard time with this page, lots of grief and lots of walking away from it only to return a few hours later and ponder some more :)

To begin with I coloured the image with Polychormos and copper Promarker.  For the background I used a clock embossing folder and hammered the areas I wanted embossed - yes I used a hammer hahahah (I did not want to put this through my machine as I did not want the image to be embossed, only the surrounding area).  The image does not come with the spring, I drew that in :)

Next I covered my book pages with some paper from Kaban.  I thought the paper would be great but once I had got this far I really didn't like it and that is where it all started to become a real pain in the behind.  I keep trying to find ways to added text other than hand written and found a method of using tissue paper and embossing powder.  The tutorial said the tissue paper would be almost invisible but, well it is a bit transparent but not really invisible enough for what I had in mind grrrrrr.  Next I added some texture plastic in a few areas and then airbrushed the background with black and brown Promarkers) For the dies I used the XCut Pocket Watches die set to make my watches, I also used Graphic 45 659053 clock die set.  Another Sizzix border die was used and finished off with tiny pink gems (I managed to drop all the gems in the packed onto the floor, along with a whole box of tiny brads - as you can see this has been a trial of tribulation from start to finish hahaha).  The dies were nearly all cut using gold metal sheet, pink and black card were also used for the watch faces. The sentiment btw reads 'Sometimes your only available transportation is a leap of faith' which I thought was rather appropriate to go with the image and the spring the girl is sitting on which I added - anybody fancying this form of transport really would need to have faith :).

The final bit of work on this was to add Stampendous Frantage Micra in copper, bronze and gold, lots of yummy texture :)

Ingredients:-
  • Image - Voyager II by Lucy Loo of The East Wind
  • Colouring medium - Polychromos and Promarkers
  • Dies - XCut Pocket Watches die set and Graphic 45 659053 clock die set
  • From my stash - Frantage, gold sheet, gems, plastic mesh

Sunday, October 4, 2015

Jane presents Delphinium Fairy by Gabriella Szabo

Morning everybody, hope you are having a happy day :) :) Today I am sharing a card I have made with you using the image Delphinium Fairy by Gabriella Szabo available from the store in digi format.  
To begin with I coloured the image with Polychromos and then added a background using Pan Pastels.  I also added the leaf at the bottom of the image.  Next, using a square card blank, I cut my image to fit and fully cover the front.  Not having done this before as I do love mounting my images using dies I was struggling with the inner feeling of how flat it felt :) :) :) Next I die cut in white the Wildflower Corner die from Memory Box and then coloured the leaves and flowers using Promarkers to tone in with my coloured image and added blue embossing powder to the small blue flowers.  Finally a sentiment was added and some lace which I also coloured with Promarkers.

Ingredients:-
  • Image - Delphinium Fairy by Gabriella Szabo
  • Colouring Medium - Polychromos, Promarkers, Pan Pastels
  • Dies - Wildflower Corner from Memory Box
  • From my stash -  lace, embossing powder


Sunday, September 27, 2015

Jane presents Lil Zeba's Floral Parasol by Heather Valentin

 Morning folks and my turn to share with you a creation for this week.  Continuing with my journals for my kids I have designed this page using Lil Zeba's Floral Parasol by Heather Valentin available in both rubber and as a digi.

To begin with I coloured the image using polychromos.
Next I prepeared my journal pages with white Gesso.  Now all the time I was colouring the image the chorus from the song 'Oh What A Beautiful Morning' kept repeating in my head.  I guess that was a subtle hint that I should include the words on my journal page hahahaha.  With the chorus in mind I decided to create a background of zebra stripes and use different textures for each of the black stripes then write the text in some of the white areas.  For my textures I used black acrylic paint applied thickly (that is the shiny bit, alas could not get a good pic as the light kept reflecting off it), black velvet patterned paper, black ribbon, black lace and black beads.
 I also used black glitter.
 As the image had a button for one eye I decided to use a real button.
To link in with the button on the image I then covered the bottom left black stripe with lots more pink buttons.
A pretty simple page but at this point I felt adding anything else would just not work so walked away before I started playing and adding more items lol.

Ingredients:-
  • Image - Lil Zeba's Floral Parasol by Heather Valentin
  • Colouring medium - Polychromos and acrylic paint
  • From my stash - buttons, lace, velvet paper, acrylic paint, glitter, beads, ribbon