Hi Everybody,
I was in one of those 'moods' where I gravitate towards a certain color and go with it. As you can see, I once again used the blues and greens as the main colors for Elaine Cox "
Little Jasmine Mermaid" which is part of
Plate #48.
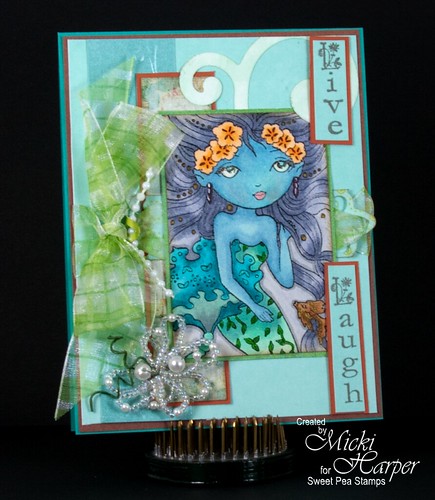
I stamped the image with Momento Tuxedo Black ink onto Neenah Classic Crest Super Smooth Millstone 80lb card stock. Millstone is a very light sand color. It actually gives your colors a different 'flavor' if you will, more of a muted tone. I colored
Jasmine with copics, taking my time. I think I played with the colors for several evenings before finally finishing her up. I also used my Twinkelette glitter pens for some glitter. Some Distress Ink around the edges of the image to help blend it in a bit.
I used some scrap DSP for the matting. The ribbon is from Offray which is threaded through a cut-down Nesties Border die (Fleur De Lis). The beaded white flowers are from Modern Romance found in the wedding aisle of your local craft store. I had some scrap paper flourish & strand 'o beads laying around so I decided to add it to the card. I will tell you that I almost ruined the card while trying to glue the flourish down. I used a glue pen and didn't realize I got some glue on my fingers. And you know how dried glue on fingers picks up any dirt, right? Well, before I realized it, I got some on her cheek. I used a sanding stick - stole it from my hubby :-) - and lightly sanded her cheek. I can still see where the 'spot' was :-(. I do hope it will encourage a newbie crafter to not worry about making mistakes.
The sentiments are from
Plate #4 - Simply Vertical - which I just cut apart. These I stamped with Momento Rich Cocoa ink onto scrap cs. (Trying to hide a couple more glue messes. I truly am one messy crafter, lol)
Now, how about YOU play with some ink and your favorite
Sweet Pea Stamp and don't forget to share your creations. :-)
What? You don't have any
Sweet Pea Stamps? Well, head over to the shop, because there are some awesome stamps on sale...... so, whatcha waiting for? ! lol..... Have fun guys!


 design team member for Sweet Pea Stamps, Fairie Song Stamps, The Frantic Stamper and Painter for Third Coast Rubber Stamps.


 Welcome to my blog. I'm the person behind kamadesign. Here you can read all about my latest crafting shenanigans, tutorials, freebies and more. Follow me here, on instagram, facebook and youtube to stay up to date. Links on top of page. Enjoy!