Hi Girls and Boys (if any here). I made card for today to showcase at Sweet Pea Stamps. If you don't have this stamp yet , you should go and get one. This image call Maggie, by amazing Elaine Cox. The good thing is, you can have this image as a digital stamp, or Red Rubber stamp. You can find this stamp HERE. Also don't forget to check our new Artist's stamps by Norma J. She is so talented.
Image was colored with mix of Prisma Pencils and Promarkers. Around image i added purple gems from Dollar store
Sentiment "Happy Birthday"you can find on Plate #4.
On blue cardstock i used MS punch, and added Die cut butterfly. I think
this is the most beautiful Die in my Eyes, because i love butterflies.
Background Papers are from Heartfelt Creations.
I hope you all will have wonderful Day, and i need to run, so many gorgeous images to collor.
Hugs Nataliya
Showing posts with label Plate #4. Show all posts
Monday, May 27, 2013
Friday, August 31, 2012
Just for you
Here's a wonderful image from Sweet Pea Stamps artist Elisabeth Bell called Sweet Incorrigiblity. I think this kiddo looks way too cute to really be incorrigible. I am using a great Spellbinders frame to cut out the image as well as a wonderful saying from the Sweet Pea Vertical Sayings plate (Plate #4).
Here's a close-up of the image so you can see the wonderful details. There's just some stamps that you see immediately and you just know it is from Elisabeth Bell, aren't her stamps adorable?Doesn't he look sweet as can be? what mom would call him incorrigible? OK, well, definitely SWEETly incorrigible, esp with those cute flowers he'd be giving her. Hope this card makes you feel like crafting today. Be sure and check out all of the Elisabeth Bell images at the store, as well as stopping by to see the current sale! Can you believe the great sale going on?
Cheers, Holley
Labels:
Elisabeth Bell,
Holley,
Plate #4,
Sweet Incorrigibility
Child of God, wife of John, sister, aunt, Paraprofessional , Electrical Engineer, LabVIEW Programmer, and most of all lover of Crafts!
I am a Rubber Stamper, Scrapbooker, Cardmaker, and jewelry designer.
Tuesday, July 5, 2011
Airship Dreams
Hi Everyone,
Today I'm sharing my card featuring Meredith Dillman's Airship from Plate #98. I love the steampunk/victorian look and feel of this image. The sentiment is from Simply Verticals - Plate #4.
Although the picture doesn't show it very well, I used Viva Decor's Glass Effect gloss:
I used Millwood Classic Crest card stock which is a tan/beige color with specks....that's why her skin has that freckled look.
This is my 3rd attempt - yes, sadly my previous attempts to do this gorgeous image justice as far as my coloring was concerned, failed miserably, lol. However, I am really really pleased how this card turned out.
Funny, isn't it...how it kinda happens when you don't expect it to. I was coloring this image in my sun room on the lounge chair using my lapdesk while watching TV.
Thanks for stopping by.....
Today I'm sharing my card featuring Meredith Dillman's Airship from Plate #98. I love the steampunk/victorian look and feel of this image. The sentiment is from Simply Verticals - Plate #4.
I knew that all the little details on her clothing would be perfect for using small rhinestones:
Although the picture doesn't show it very well, I used Viva Decor's Glass Effect gloss:
I used Millwood Classic Crest card stock which is a tan/beige color with specks....that's why her skin has that freckled look.
This is my 3rd attempt - yes, sadly my previous attempts to do this gorgeous image justice as far as my coloring was concerned, failed miserably, lol. However, I am really really pleased how this card turned out.
Funny, isn't it...how it kinda happens when you don't expect it to. I was coloring this image in my sun room on the lounge chair using my lapdesk while watching TV.
Thanks for stopping by.....
Sunday, June 26, 2011
Birthday Packages
Who doesn't like packages, especially when they are wrapped all pretty and filled with gifts, right?
Cupcakes and Presents, Plate #31 is one of my favorite sets because it's so versatile and can be colored very quickly. And that, my friends, is always a good thing because I am always doing things at the last minute :-).
I again went to my favorite standby for the sentiment, Simply Verticals, Plate #4 and just cut the letters apart to create the sentiment horizontally.
Thanks for stopping by and don't forget to check out all the sales over at the Sweet Pea Stamps shop.....
Monday, June 20, 2011
It's a Pink Thing.....
Hi Everyone,
All three of my granddaughters will be celebrating birthdays within the next couple of months. Gracy, the ornery middle one, is the first one. She will be turning 4 and like I mentioned, she is the ornery, tom-boy. So it was a no brainer to use this sassy little girl from Karen Middleton's Plate #140.
Now, this image has sassy written all over it, lol! Obviously, the hot pink was mandatory as was the hot pink Stickles. I remembered that I've had these star eyelets and that these would make perfect spots to hold Stickles.
The sentiment is from Simply Verticals - Plate #4 which was stamped with pink dye ink and then embossed with some old pink embossing powder.
Fun stamp to color. And I'm pretty sure the onery 4 year old will love it!
Thanks for stopping by!
Wednesday, June 1, 2011
Live Laugh and Love!
Here's a wonderful Sweet Pea image from artist ching-chou kiuk. This lady is called Moon Garden and she is sold separately or on Plate #124. I love her mystical look as she is staring off and lost in thought. It makes this wonderful saying match her so well.
"Don't walk in front of me, I may not follow; Don't walk behind me, I may not lead; Walk beside me and just be my friend." (Plate #121); I used a wonderful printed sheet of black and white paper to add a little more "noise" to the background of the card. The punch on the left is from Martha Stewart. The beautiful vertical saying comes from the Vertical sayings sheet (Plate #4).
Hope you will have Live, Laugh, and Love today! Also, I am having blog candy this week of wonderful Sweet Pea stamps celebrating over 100,000 hits on my personal blog, so be sure to stop by there and leave a comment on my personal blog for a chance to win some Sweet Pea stamps!! Holley's Blog (sign ups end on June 6th)
Hugs, Holley
Hope you will have Live, Laugh, and Love today! Also, I am having blog candy this week of wonderful Sweet Pea stamps celebrating over 100,000 hits on my personal blog, so be sure to stop by there and leave a comment on my personal blog for a chance to win some Sweet Pea stamps!! Holley's Blog (sign ups end on June 6th)
Hugs, Holley
Labels:
ching-chou kuik,
Holley,
Moon Garden,
Plate #121,
Plate #124,
Plate #4
Child of God, wife of John, sister, aunt, Paraprofessional , Electrical Engineer, LabVIEW Programmer, and most of all lover of Crafts!
I am a Rubber Stamper, Scrapbooker, Cardmaker, and jewelry designer.
Friday, January 7, 2011
Sea Dragon
Hi everyone and a Happy New Year! In last weeks post I had mentioned that I was totally out of sync coloring and I decided to really 'play' with the Copic colors. I had not had a chance to play with Jennifer Nilssons beautiful images from Plate #80, in particular this adorable little Sea Dragon:


I just let my fingers pick the colors and for once didn't worry about getting the shading right (because I never do, lo). For the background I also used Copic YR01 then went over it with the Blender pen pushing the colors towards the image.
Unfortunately I cut into the fish and the tail but salvaged the image by adding rhinestones.

I'm not particularly fond of these rhinestone 'strips' because of the glossy panel they come on but it sure is easier on the fingers. I used up some old adhesive backed ribbon and paired this image with one of the sentiments from Simply Vertical, cutting it apart in an attempt to achieve some balance.
Thanks for stopping by and check out the rest of the gorgeous images that come on Plate #80.
Friday, December 24, 2010
My Champion
Hi everybody, I needed a quick birthday card for a little boy who is already showing his football spirit. I immediately thought of the adorable Gum Drop Gang's Cameron from Plate #16:
I kept the design of the card simple since this card is for a little boy who wouldn't like a lot of embellishments. I stamped the You are my Champion sentiment which is also from Plate #16 onto scrap card stock and then cut the sentiment apart. The Happy Birthday sentiment is from Simply Verticals Plate #4, also cut apart and layered next to each other.
The Gum Drop Gang is adorable and really quick to color, sure to delight anyone. I know that Cameron, Hayden, Molly and Olivia always bring a smile to my face :-).
I kept the design of the card simple since this card is for a little boy who wouldn't like a lot of embellishments. I stamped the You are my Champion sentiment which is also from Plate #16 onto scrap card stock and then cut the sentiment apart. The Happy Birthday sentiment is from Simply Verticals Plate #4, also cut apart and layered next to each other.
The Gum Drop Gang is adorable and really quick to color, sure to delight anyone. I know that Cameron, Hayden, Molly and Olivia always bring a smile to my face :-).
Thursday, December 2, 2010
Jinx'd
Hi Everyone!
For my card today, I played with Brigid Ashwood's Jinx from Plate #74.

For my card today, I played with Brigid Ashwood's Jinx from Plate #74.

I look at this stamp (and all the other gorgeous stamps at Sweet Pea Stamps) and I can literally see the spunk and sassy(ness) of this Phunky Phairie. Although I think I may have been 'jinxed' because I made several coloring mistakes (yup, again) and then as I was trimming around the image, I cut off part of her wing.
I paired her with a sentiment from Simply Verticals - Plate #4 which I cut apart and slightly distressed the edges. Used a memo pin and 3D foam to adhere to the card. To cover the foam dot at the bottom through which the memo pin is pinned, I used the foliage metal trinket.
Tuesday, July 27, 2010
Elaine Cox Little Jasmine Mermaid
Hi Everybody,
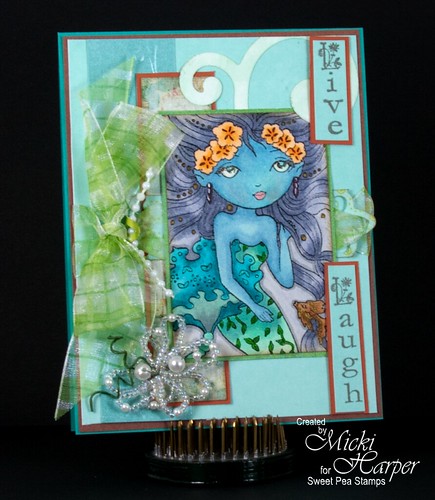
I was in one of those 'moods' where I gravitate towards a certain color and go with it. As you can see, I once again used the blues and greens as the main colors for Elaine Cox "Little Jasmine Mermaid" which is part of Plate #48.

I stamped the image with Momento Tuxedo Black ink onto Neenah Classic Crest Super Smooth Millstone 80lb card stock. Millstone is a very light sand color. It actually gives your colors a different 'flavor' if you will, more of a muted tone. I colored Jasmine with copics, taking my time. I think I played with the colors for several evenings before finally finishing her up. I also used my Twinkelette glitter pens for some glitter. Some Distress Ink around the edges of the image to help blend it in a bit.
I used some scrap DSP for the matting. The ribbon is from Offray which is threaded through a cut-down Nesties Border die (Fleur De Lis). The beaded white flowers are from Modern Romance found in the wedding aisle of your local craft store. I had some scrap paper flourish & strand 'o beads laying around so I decided to add it to the card. I will tell you that I almost ruined the card while trying to glue the flourish down. I used a glue pen and didn't realize I got some glue on my fingers. And you know how dried glue on fingers picks up any dirt, right? Well, before I realized it, I got some on her cheek. I used a sanding stick - stole it from my hubby :-) - and lightly sanded her cheek. I can still see where the 'spot' was :-(. I do hope it will encourage a newbie crafter to not worry about making mistakes.
The sentiments are from Plate #4 - Simply Vertical - which I just cut apart. These I stamped with Momento Rich Cocoa ink onto scrap cs. (Trying to hide a couple more glue messes. I truly am one messy crafter, lol)
Now, how about YOU play with some ink and your favorite Sweet Pea Stamp and don't forget to share your creations. :-)
What? You don't have any Sweet Pea Stamps? Well, head over to the shop, because there are some awesome stamps on sale...... so, whatcha waiting for? ! lol..... Have fun guys!
I was in one of those 'moods' where I gravitate towards a certain color and go with it. As you can see, I once again used the blues and greens as the main colors for Elaine Cox "Little Jasmine Mermaid" which is part of Plate #48.

I stamped the image with Momento Tuxedo Black ink onto Neenah Classic Crest Super Smooth Millstone 80lb card stock. Millstone is a very light sand color. It actually gives your colors a different 'flavor' if you will, more of a muted tone. I colored Jasmine with copics, taking my time. I think I played with the colors for several evenings before finally finishing her up. I also used my Twinkelette glitter pens for some glitter. Some Distress Ink around the edges of the image to help blend it in a bit.
I used some scrap DSP for the matting. The ribbon is from Offray which is threaded through a cut-down Nesties Border die (Fleur De Lis). The beaded white flowers are from Modern Romance found in the wedding aisle of your local craft store. I had some scrap paper flourish & strand 'o beads laying around so I decided to add it to the card. I will tell you that I almost ruined the card while trying to glue the flourish down. I used a glue pen and didn't realize I got some glue on my fingers. And you know how dried glue on fingers picks up any dirt, right? Well, before I realized it, I got some on her cheek. I used a sanding stick - stole it from my hubby :-) - and lightly sanded her cheek. I can still see where the 'spot' was :-(. I do hope it will encourage a newbie crafter to not worry about making mistakes.
The sentiments are from Plate #4 - Simply Vertical - which I just cut apart. These I stamped with Momento Rich Cocoa ink onto scrap cs. (Trying to hide a couple more glue messes. I truly am one messy crafter, lol)
Now, how about YOU play with some ink and your favorite Sweet Pea Stamp and don't forget to share your creations. :-)
What? You don't have any Sweet Pea Stamps? Well, head over to the shop, because there are some awesome stamps on sale...... so, whatcha waiting for? ! lol..... Have fun guys!
Sunday, February 28, 2010
Follow your Dreams
Hi Everyone,
For my card today, I used ©ching-chou kuik's Love is Gone. I also tried to step outside my comfort zone using several embellishments and lots of layers.
After coloring the image with Copics, I use my Copic Atyou Spica Glitter pens to add some sparkle. I also used Dimensional Glaze on the sun in the upper left hand corner. After assembling the layers, I stamped out the sentiment from Verticals Plate 4 but because it was a bit too long, I just cut the individual words apart, used Distress Ink to blend the edges, then layered them onto card stock and stacked them to make them fit :-).
I found some K&Co. Winter Wonderland Paper Pack & Die-Cut papers in the clearance aisle at Jo-Anns which worked great with the color theme. Just because it says Winter or Christmas, doesn't mean I can't use them for other seasons, right? The flower is from Prima and the butterfly embellishment is from Accent Factory.
Here is a close up, hopefully you'll be able to see the glitter:
I definitely have to work on adding bling & embellishments, to get comfortable with that. Thanks for stopping by and be sure to swing by Sweet Pea Stamps, especially if you haven't seen the latest release.... you're going to love it!
For my card today, I used ©ching-chou kuik's Love is Gone. I also tried to step outside my comfort zone using several embellishments and lots of layers.
After coloring the image with Copics, I use my Copic Atyou Spica Glitter pens to add some sparkle. I also used Dimensional Glaze on the sun in the upper left hand corner. After assembling the layers, I stamped out the sentiment from Verticals Plate 4 but because it was a bit too long, I just cut the individual words apart, used Distress Ink to blend the edges, then layered them onto card stock and stacked them to make them fit :-).
I found some K&Co. Winter Wonderland Paper Pack & Die-Cut papers in the clearance aisle at Jo-Anns which worked great with the color theme. Just because it says Winter or Christmas, doesn't mean I can't use them for other seasons, right? The flower is from Prima and the butterfly embellishment is from Accent Factory.
Here is a close up, hopefully you'll be able to see the glitter:
I definitely have to work on adding bling & embellishments, to get comfortable with that. Thanks for stopping by and be sure to swing by Sweet Pea Stamps, especially if you haven't seen the latest release.... you're going to love it!
Sunday, February 21, 2010
Spring-Moony-Night
This beautifully detailed stamp is ching-chou kuik's Spring-Moony-Night. It is sold individually or as a part of Plate #22. I love the wishful look on her face, as though she is holding up a lantern waiting for her partner to come home. Next time I use this stamp, I am going to either cut the background out and use black paper or I will just color the background dark blue or black.

The image is stamped with Memento ink and colored with Copic Markers. I mounted the stamped image on printed paper, the same paper that I stamped the Thinking of You sentiment (plate #4). I used some detailed paper ribbon from K&Co across the bottom and enhanced it with bling.
Have a wonderful day!
Holley
The image is stamped with Memento ink and colored with Copic Markers. I mounted the stamped image on printed paper, the same paper that I stamped the Thinking of You sentiment (plate #4). I used some detailed paper ribbon from K&Co across the bottom and enhanced it with bling.
Have a wonderful day!
Holley
Labels:
ching-chou kuik,
Holley,
Plate #22,
Plate #4,
Spring Moony Night
Child of God, wife of John, sister, aunt, Paraprofessional , Electrical Engineer, LabVIEW Programmer, and most of all lover of Crafts!
I am a Rubber Stamper, Scrapbooker, Cardmaker, and jewelry designer.
Sunday, November 1, 2009
Katarina's October Challenge Entry
For this challenge of blue/yellow/red I have used Molly,
birthday text from Sweet Pea Pals plate 9 and vertical text from plate 4.
Labels:
Gum Drop Gang,
Katarina,
Plate #4,
Plate #9
Friday, September 4, 2009
Thinking of You
Here's a great black and white card featuring a lady stamp from Plate #7 and a sentiment from Plate #4. That's perfect for the BOGO sale going on at the site right now. You can buy one set of stamps and get the other set free. See Sweet Pea's website for details.

To make this cute card you will need: black A2 size card, 6x6" pattern paper, Plate's 7 - lady stamp and Plate's 4 - "Thinking of you" stamp, Versafine Ink, Flower embellishment, Fiskar's border punch, black and white cardstock.
1. Stamp the lady image 3 times, once on white cardstock, once on the patterned paper, and once on black cardstock. The image on white cardstock will be your final image. Trim the pants from the stamped image on the patterned paper and glue them to the final image; then, trim out the shirt from the lady stamped on black cardstock and glue it to the final image.
2. Neatly trim the final image and mount it on black paper. I used Copic E00 to color in the skin of the woman.
3. Take the black and white patterned paper (sample uses DCWV); Cut a strip that is 3.5" wide and use a Fiskar's border punch to trim one side. If you don't have a Fiskar's punch, how about some cute decorative scissors? Once trimmed, adhere the patterned paper to the black card.
4. Adhere the final lady image to the card. Beneath the lady I added a black flower and matching brad (Prima and Making Memories).
5. Trim the edge of the card off at about 1" deep. Cut a strip of white cardstock 1.5" wide and stamp the "Thinking of You" sentiment from Plate #4. Adhere the sentiment to the card.
Happy Friday!
Holley
Child of God, wife of John, sister, aunt, Paraprofessional , Electrical Engineer, LabVIEW Programmer, and most of all lover of Crafts!
I am a Rubber Stamper, Scrapbooker, Cardmaker, and jewelry designer.
Wednesday, June 17, 2009
Party Divas


In a hurry for cute party invitations but don't want a bunch of cards that look like they were done on the assembly line? Try these two samples. They are made using the same supplies, making them easy and efficient while not all looking the same.
Supplies:
Bodacious Mermaid Stamp
Party Time Stamp
Black VersaFine Ink Pad (Tsukineko)
Kaleidacolor Autumn Leaves Ink Pad (Tsukineko)
Copic Markers (Imagination)
- G94 Grayish Olive
- G24 Willow
Adirondack Markers (Tsukineko)
- Mushroom
- Rust
- Ginger
Printed Cardstock (Unknown)
Green Card Stock (Bazzill)
Double Sided Tape (Provo Craft)
Sticker Maker (Xyron)
Mod Podge (Plaid)
Scissors
Paper Trimmer
Instructions:
- Stamp the mermaid image on white card stock, trim out neatly and color. Use the greens for the tail, the pink for the shell top, peach for the skin and the remaining colors for the hair.
- Cut the green card stock to 4.25" x 11" and fold to 4.25" x 5.5".
- Ink the party time stamp using the Kaleidacolor ink pad, make sure to use all the different colored inks and the letters are all coated. Stamp the image on the white card stock.
- Stamp the image parallel to the first image about .5" away from the first stamped image.
- Continue to stamp the image at least 7 times. Try to move the words of the image up and down each stamped line to give the card more interest.
- Cut the back ground paper to 4" x 5.25" positioning the stamped images within the area in a pleasing manner.
- Attach the background paper to the front of the card with double sided tape.
- Attach the mermaid to the card front with Mod Podge.
- Cut a 1" x 2" strip of the printed cardstock, run through the sticker maker and cut into two 1" x 1" pieces.
- Cut the one inch printed cardstock pieces at a diagonal to create corners and attach to the card front.
To create the second card:
- Ink the party time stamp using just the red color from the Kaleidacolor ink pad and stamp.
- Trim away the excess paper from the stamped image allowing for a .75" strip.
- Cut a 1" x 5.5" strip of the printed cardstock.
- Run both the printed cardstock and stamped image strip through the sticker maker and attach the stamped image onto the printed strip.
- Create another green card as before and attach the matted, stamped image to the front about .25" away from the left hand edge.
- Create another mermaid image as before and attach to the card front.
- Enjoy Sharing!
Labels:
Bodacious Mermaid,
Jennifer Willis,
Plate #3,
Plate #4
design team member for Sweet Pea Stamps, Fairie Song Stamps, The Frantic Stamper and Painter for Third Coast Rubber Stamps.
Tuesday, June 16, 2009
Priceless !
Love these long strippy sayings - they could go down the card but I thought something like PARTY TIME had to be screaming across the card. This card will be a birthday card for a JULY 4 birthday.
2. Cuttlebug Birthday across white
3. Stamp "Party Time" and add more color with a contrasting color marker
4. Layer and adhere; add some punchies and brads for more fun.

I love the "priceless" stamp for the back of a card, but decided to try putting it on the front. I was kind of tickled with how this turned out.

1. Stamp the mermaid on fish images randomly with a dark color leaving large gaps between
2. Repeat with 2 lighter colors and fill in the gaps
3. Layer with solid and coordinating print cardstock
4. Stamp "Happy Birthday" using quick dry pigment ink on colored twill tape
5. Stamp "Priceless" on scrap of print background
6. Highlight just ONE of the fish/mermaid images with glitter glue, dazzles, or sparkle of your choice. Mine doesn't show up in the scan but is pearlized with twinkling H2O's and does stand out from the crowd.
More fun with the fish and mermaid pair.
1. Use the seabed stamp and a kaleidoscope pad to create an underwater hillside for the fish to swim down.
2. Color fish and mermaid with prismacolor pencil
3. Deckle cut edges and rub with dabber or cosmetic sponge
4. All images have been sparkled with a variety of glitter glues; my scanner doesn't like sparkle
5. Stamp sentiment on scrap; attach and border with brads. Again these are sparkly metallic brads but my scanner is keeping that a secret!
Subscribe to:
Posts (Atom)