Showing posts with label Plate #36. Show all posts

Monday, July 25, 2011

Holly Fairy

Hi Everyone,

I think the heat is generating wishful dreams of Christmas, snow and cool temperatures which meant I finished coloring ching-chou kuik's Holly Fairy, part of Plate #60. The sentiment is from Plate #36.


This fairy had been in my 'unfinished' drawer for a while but I thought I'd give it a shot to see if I could get something going. The card itself isn't anything fancy BUT I think I saved this gorgeous fairy. And I wanted a silver background - something shimmery. So I used my silver metalic Sharpie pen.

I also used Viva Decor Gel Gloss on the berries and added some shimmer and glimmer to her wings with an orange Atyou Spica pen. Since I used copics to color the image, I made sure to do the background with the sharpie last.

Thanks for stopping and don't forget to check out the store for the latest new releases!

Tuesday, November 2, 2010

Unregrettable.....

Hi Everyone,

For my card today I decided to finish coloring one of the many gorgeous stamped images that are on my desk. Plus I wanted to use this awesome transparency overlay a friend of mine had given me which I thought was perfect for this image from Ching Chou Kuik's
Unregrettable Pirate Life:


The base card stock is turqoise die cut with the large die from the Mega Ovals Lrg Nestabilities set.

The image is stamped with Memento Tuxedo ink and colored with copics. Orange ribbon is from my scrap ribbon jar which is also where I got the blue ribbon to create the flowers. I placed the ribbon buds on top of Prima flowers and surrounded each with some leftover dew drops.


Well, I'm off to play with one of the new stamps. Thanks for stopping by and be sure to check out Sweet Pea Stamps SALE page. Actually you should really check this page daily, lol.... I know I do :-) and don't forget about the chance to win a $50 Shopping spree (read all about it HERE).

Tuesday, October 19, 2010

Misty Reflections Halloween Style


For my card today, I'm pulling out all the stops, lol.... Halloween stops that is. It's not that I hoard paper, but after last Halloween season, all these great papers were sooooo cheap that I couldn't resist. Anyway, I am trying to use up as much Halloween stash as possible which is really evident in my card today.

When I get my Sweet Pea Stamps happy mail, the first thing I do is trim the rubber, of course, but then I immediately stamp out several copies of each stamp. Problem is that I sometimes forget, especially when I get the latest releases :-), that I have a whole box of not-so-new-but-just-as-awesome Sweet Pea Stamps stamped images ready to be colored.

I used Misty Reflections from Plate #36 for my card today. Colored with Copics and background is chalks. I should not have used my SU chalks..... sigh, they are not as great as the Pebbles, Inc. chalks.

The bats are from ribbon which I just cut apart.


Used craft wire to string a paper rosette and then tore the folds.
Ok actually it was an 'oops' - you know me.


Also pulled out my Martha Stewart Spider Web border punch and
found the metal sentiment in my stash box.


Perhaps a bit too much 'stuff' on the card, but it sure was fun to create this card.

Tuesday, August 3, 2010

Ahoy Matey.....

Hello everyone! I live in a small village in Wisconsin that is just up the road from Port Washington which is a Marina town and their theme is Pirates so when I saw the magnificent pirate stamps I just knew I had to have them and color them up.

This stamp is Ching-chou kuik's Caribbean Treasure from sheet 10, plate 36 available of course at  Sweet Pea Stamps.


I colored her with copics and added some glossy accents on the skulls and her eyes. Some stickles here and there were added to make her sparkle. Liquid Pearls in Opal added deapth with the tiny dot accents and to make her string of pearls. Her treasure chest is filled with gem stones as well as placed along side of her.  Skull and cross bones and daggers finish the corners. Thanks for letting me share!!!

Copics:
Clothes: R22, R37, R39
Shell: Y13, YR04, YR07
Chest: Y25, E25, W5
Rocks: C1, C5, C7, C9
Hair: RVoo, RV11, RV19, R85
Scarf: B12, B21, B24
Skin: E00, E02, W1
 
"Life's Beauty Inspires Me To Kreate"

Thursday, July 22, 2010

Lisa Victoria's Storytime

Enchanted Storytime


Hello Sweet Pea Stampers,

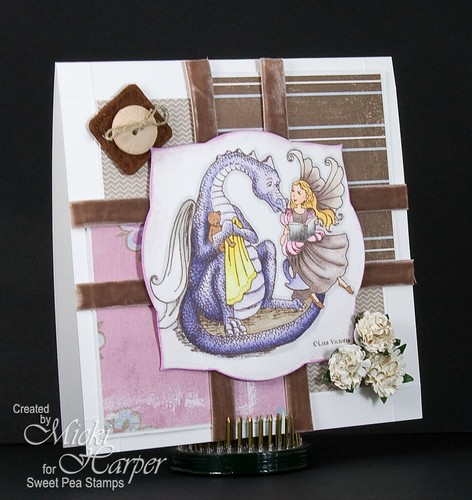
I had so much fun coloring Lisa Victoria's dragons, that I decided to feature "Storytime" from Plate #36 today. After coloring the stamped image, I used Labels Three die from Spellbinders to die cut the image. I used a sponge with Distress Ink to blend in the edges a bit. The papers are from My Minds Eye's Wild Asparagus line. I added the rows of velvet ribbon to, errr, hide a boo-boo :-). You can barely see it, I had dry embossed a single line around the edge of the card. I added a button on top of a square felt button and I also added Prima Flowers. I took Vintage Photo Distress Ink pad and just rubbed it on top of the flowers which I thought turned out pretty good. Makes it look like the edgfe of the flower petals are two toned. :-)

All in all, I am pretty happy with how this card turned out. What do you think? Thanks so much for stopping by and make sure to check out the Sweet Pea Stamps store. More new releases and definitely check out the Sale page.... and then grab your Sweet Pea Stamps and get inky!

Friday, May 7, 2010

International Talk Like a Pirate Day

Let's celebrate! Today is Talk Like a Pirate Day and I couldn't think of a more fitting way to celebrate than with a card using the beautiful  images from Plate #36 - Soft Goth Night, Caribbean Treasure and Unregrettable Pirate Life.


This card measures 6" x 6". Copics were used for the coloring, paper is Scenic Route and DCWV. It's embellished with Prima flowers and found objects. The sentiment inside was printed using Blackadder ITC - 36pt font.

Copic colors:

  1. Color the Caribbean Treasure image using the baby skin pink and blush for the skin and mouth, rose red and shock pink for the tail and eyes,  canary and cadmium yellow for the hair, gold on the treasure and chest, the clothing, and the pile of rubble and tattoo are warm gray no. 1, 3, and 5,
  2. Color the Unregrettable Pirate Life image using pinkish white and pale cherry pink for the skin, cardinal for the tail and lips, canary yellow for the sun, gold on the clothing, belt and hat embellishment, to color the hair use the warm gray colors, and the chain and eyes are warm gray no. 5.
  3. Color the Soft Goth Night image with the eggshell and powder pink for the skin, rose red and shock pink for the rose, tattoo and lips, Nile green on the leaves, the tail is blue green and the clothes are colored with the cool shadow and ice ocean.
For full instructions you can visit Stampers Quest. Enjoy Sharing! j

Thursday, April 8, 2010

She's Got a Lot of Booty!

Hello! I have made a card today using Caribbean Treasure from ching-chou kuik's Fantasy Art Collection (sheet 10, plate 36). I saw her in my head as a dark skinned beauty ruling the seas with her band of pirate henchmen! The treasure chest was especially fun to play with. I used a combination of liquid pearls and different colored stickles for the treasure. I think next time I will add a few seed beads to the mix as well.

The Details:
Stamp: Carribean Treasure - ching-chou kuik's Fantasy Art Collection (sheet 10, plate 36) Sweeet Pea Stamps
Paper: Creative Imagination, Chocolate Chip (SU), White (Paper Trey Ink)
Ink: Memento Tuxedo Black, Walnut Distress Ink
Copics:
Skin: E25,E27,E29,R22
Hair: C5,C7,C9,110
Clothes: YG03 w/Rv00 over it, YG95,YG97,YG99,B32,B34,B39
Background: B32,W0,W1,W3,W5
Treasure Chest: E74,E77,E79, Y21,Y26,Y28
Misc: Stickles - (Golden Rod, Burgundy, Lime Green), Scallop Border Punch (SU), Ribbon (SU), Espresso Dimensional Pearls, Martha Stewart Skull and Crossbones punch.


I hope your day is magical!
:-)Traci

Sunday, March 28, 2010

Unregrettable Pirate Life

Hello! I have made a card today using Unregrettable Pirate Life from ching-chou kuik's Fantasy art Collection (sheet 10, Plate 36). I pulled almost every color that I colored her with from the colors in the DP. For a little extra interest I used a lot of brads on some strips of brown cardstock and put them diagonally on two corners of the background. I was hoping it would give the impression of the studded leather or wood that you might find on a treasure chest!

The Details:
Stamp: Unregrettable Pirate Life - ching-chou kuik's Fantasy Art Collection (sheet 10, plate36) - Sweet Pea Stamps
Paper: Creative Imaginations, Chocolate Chip (SU), White (Paper Trey Ink)
Ink: Memento Tuxedo Black
Copics:
Skin:R00,E00,E11,E13,R20
Hair:E50,E53,E55
Clothes:E55,E57,E59,YR15,YR16,YR18,W0,W1,W3
Background:BG10,BG11,BG13,E50,Y21,Y26,Y28
Misc: Gold Brads (SU), Gold Gel Pen

I hope your day is magical!
:-)Traci

Saturday, March 27, 2010

Soft Goth Night


Today I have a card to show you that I created with Soft Goth Night. This image is from Sweet Pea Stamps ching-chou kuiks Fantasy Art Collection sheet #10/ plate #36. The sentiment is from sheet #8/ plate #30.

I used some DP that I got at Michaels awhile back in the dollar section. I used a chipboard frame from Technique Tuesday that I covered in some plum colored PTI card stock. The flowers are prima and the white one's were from Joann's wedding section(2 of them I colored black with a prisma marker). I also added some more color to the prima flowers with copics V04 and V15. I added some diamond bling to the centers of the flowers. I also added some black bling around the top corner of the frame and added 3 to her headband. I used a QuicKutz die to create the flourish.

I drew in the rest of her fins on her tail!! Yes I drew it!! I can't draw so I am so happy with the way she turned out. So now I'm not afraid to try it again. I drew it in with a copic multiliner, and I made her eyelashes longer. I also went over the black spots on her tail with a Sakura clear star gel pen. The decorative ends on the sentiment was created with a spellbinder accessory die. If you haven't ordered this set yet it's a must have!! Well are her images are a must have as they are all so beautiful!!

Copics Used For Soft Goth Night
Skin: E0000,E00,E11,RV02
Eyes: V04,V15,V12
Hair and clothes/tail: RV000,V000,V12,V04,V15,V17,RV02,BV08 and BV17

Monday, March 22, 2010

UTEE and Fantasy Art Stamps - Let's Play


Let's play with some UTEE and ching chou kuiks Fantasy Art stamps! 
Disclaimer: No rubber stamps were harmed in the process - just in case you were wondering :-)!

This project is a fun to do because you can let your inner artist come out to explore all kinds of different creative ideas. Basically I mean go wild and have fun! Gather your supplies and let's get started!
 
Supplies you will need:


  • UTEE (Ultra Thick Embossing Enamel)
  • Melting Pot
  • To Dye For Ink
  • Pigment or Permanent Ink
  • Rubber Stamps

 
  • Craft Stick or Spatula
  • Non-stick Embossing Craft Sheet
  • optional: Dry Pigment Powders
  • optional: Glitter, Beads, Charms, etc.
  • Wonder Tape or Glue


Working on a sturdy, protected area plug in your Melting Pot. Pour clear UTEE in the pot to melt, cover with lid .

Keep your melting pot covered while the UTEE is melting. This helps to melt your embossing enamel more quickly and efficiently. 
(Having said that, once I started pouring the melted UTEE, I completely got lost in what I was doing that I did not put the lid back on in between pourings)

While we're waiting for the UTEE to melt, grab your Sweet Pea Stamp of choice. I grabbed the angel stamps from Plate 17, ching-chou kuik's Caribbean Treasure from Plate 36 and ching-chou kuik's Dark Sirene from Plate 24.
(Ok, I admit I dragged them all out - after all, I don't play too often with the Melting Pot and UTEE so when I do, I take full advantage of it :-) )


I used StazOn Azure ink to ink up my stamp. You can use any pigment ink, but I like the results I got with StazOn. Be sure to ink up your stamp really well.


Once the UTEE was completed melted, I added 3-4 drops of To Dye For Ink.

Using a craft stick or spatula, stir it really well.


Pour the melted UTEE onto the craft sheet.

Now hold your breath, lol and press your inked stamp into the melted UTEE.


As you press, it's normal that some of the melted UTEE will push out on the side - creating like a wedge shape. No worries, that's perfectly ok.

Leave the stamp in the UTEE until it cools completely.


I didn't have time to trim or apply repositionable glue on the back of the images from Plate 36 yet. I didn't let that stop me. As seen here, I used ching-chou kuik's Caribbean Treasure without an acrylic block.

Once the UTEE cools, the stamp will lift out easily.


Peel image from craft sheet, if desired trim while still warm or use a hot knife. I like the look of the excess UTEE and didn't trim any of it.


Save all excess pieces of UTEE or any pieces that you are not happy with because you can re-melt these. I safe mine in a sandwich bag for later use.
 
Oh you can also make your own dew drops :-).


Here is a close up (blurry - sorry) of the stamp after I peeled it off the melted UTEE.

See, no harm done. After a good scrub with StazOn cleaner, my stamps looked good as new!

Now you can embellish your piece with glitter glue or charms or you can use pigment ink powders to add more definition. You can attach your piece to a card or leave as is to use as a suncatcher. The piece will be see through, just remember that the stamped image will appear in reverse if you use the non-stamped side. If you plan on using it as a sun catcher, use a toothpick to poke a hole while the finished piece is still warm.

I wanted to create a piece of wall art, so let's continue:


Using card stock from DCWV's Old World Stack and my Lattice Shapeabilities pendant, I die cut 2 pieces which I glued back to back.


I applied my finished piece on top of the lattice die cut with Zippy Paper Glue and yes, my piece cracked. I left it like this because it adds character.... I like it :-). At this point, I could have called this piece finished.

But since I love hardware stores and wanted something a little sturdier, I dug out my Formica sample chips.


You can find these at any home improvement center in the cabinet/counter section.

Using a regular glue stick, I adhered a piece of DP cut slightly larger than the Formica swatch.

Next I used my sanding pad to sand along the edges which gives gets rid of the excess paper and finishes the edges.

I added my melt art on top of the covered Formica with glue. Finishing the whole piece off with different embellishments.


Here are a couple of close-ups!


I hope you enjoyed this tutorial. I'm by no means an expert but the whole idea is to experiment and have fun.

As you can see from my piece, there are no mistakes just opportunities to embellish!

I'll leave you with another look at the finished piece!