Friday, April 30, 2010

NEW! Lisa Victoria sheet #2, plate #49


pre-order by May 3rd
will not begin shipping until May 10th

Restless Thoughts


This image is titled Restless Thoughts and is part of the ching-chou kuiks Fantasy Art Collection. I hadn't looked at the artist's colored version in some time, so find it interesting that we both used purple, or perhaps not since purple is my favorite color. I also managed to see her with a bit more skin showing, LOL! That is one of the things I love about stamps- everyone sees them just a bit differently!

Thursday, April 29, 2010

Connie-Alice and Piglet Half Circle Card


This card was done using a little trickery to get the effect I wanted.

Supplies I used:
Cuttlebug machine
Spellbinder dies: Scalloped Circles & Standard Circles
Scor Pal
Copic markers
Leafing pen
flower punch by Nellie Snellen
Alice and Piglet plate #44 by Elaine Cox (you can find these delightful images HERE
sentiment also from plate 44

Directions:

1) Cut cardstock for A2 size card and score in half.
2) Score front of card in half again and fold over to folded edge
3) Using Cuttlebug, lay down A plate and C plate first, center the scallop circle die on C plate with
cutting edge facing UP (it helps to put a small pc. of tape on plate to hold die)
4) Lay your card on top of die with top or card front fold at midpoint of circle, fold up and back to attain this point.
5) Now fold top fold down over die, Slide B plate to mid point ONLY of die, using fold line for reference.
(This is key to getting only half the die to cut) Your "sandwich" will be offset with top or B plate only half on top.
6) Run this through Cuttlebug. Make SURE to lay your card in Cuttlebug with back or unfolded part away from you and folded or top toward you.
This will ensure your circle cuts on the very top part. *Don't ask me how I know that*

Below is a link to a video on YouTube for those of us who are now thoroughly confused:


Below is a camera shot that will hopefully allow you to see how the circle "turns"


I like to think that I am better at stamping than I am at using a digital camera.......

Connie


Final Raffle Drawing, Raffle #8: winner is....

this is for the NEW Elaine Cox sheet, sheet #6, plate #48 (that was released yesterday)

The winner is..... make yellow

Thank you to all who came to our celebration and to those that could not make it!

Raffle #7: Winner is----

This raffle drawing is for our celebration sheet, our One year Anniversary sheet.

The winner is.... sheng vang

Raffle #6: winner is----


This raffle drawing is for a $5 gift certificate.
the winner is
....Camelot4101

Raffle #5: Winner is----

The raffle is for our Gum Drop Gang, Hayden, plate #8
:The winner is: Danielle Hayes

Raffle #4: winner is-----

This raffle drawing is for plate #2.


: the winner is: Teresa Sherman

Raffle #3: Winner---

This raffle is for a 6 count grab bag, no sentiments, our choice:
winner is:Alyssasmom

Raffle #2: Winner

This raffle is for a 6 count grab bag, no sentiments, our choice:
winner is:kerry kung

Raffle #1: Winner

This raffle is for a 6 count grab bag, no sentiments, our choice:
winner is:Jennifer Koss

Winner of SNR $20 Gift Certificate is.....

#2 Gini Williams

SNR Party: Todays Raffle Contestants

Here are the list for the reffles I will be conducting today. The names are the screen names, next to each name is your number, when I draw the lucky number. I will be doing them periodically throughout the day.
I will be only listing the screen names on this blog post, you will keep the same number for all 8 raffles.

Teresa Sherman 1
Mimi Lee Pang 2
Corina Mitchell 3
Lorraine Betteridge 4
Jennifer Koss 5
Kym Kreates 6
Makeyellow 7
Sarah K 8
The Paper Princess 9
Donna Mundinger 10
Brandi Burns 11
Camelot4101 12
Alyssamom98 13
Melenth 14
Kerry Kung 15
Gini Willimas 16
Merry Sixt 17
Danielle Hays 18
Sheng Vang 19
Kimbery2335 20

Good Luck to you all today!

SNR Party- $20 SPS Gift Cerificate Drawing

The question from the party, was "My husband and I are celebrating our ___ year anniversary today. The answer is on my blog profile, but I set it up a year ago, so the correct answer is 21. 3 persons are entered in the drawing that answered it correct. I am assigning you each a number below:

Sheng Vang 1
Gini Williams 2
Merry Sixt 3

Drawing will be at 8:00 am

Wednesday, April 28, 2010

Elaine Cox, sheet #6, plate #48


NEW! Elaine Cox, sheet #6 (plate 48)

on sale through May 1st

will not begin shipping until May 7th

Moonlight Whispering

Hello! For my card today I have used the gorgeous Moonlight Whispering from ching chou kuik's Fantasy Art Collection (sheet 11, plate 38). The sentiment is from sheet 2, plate 21.
The Details:
Stamps: Moonlight Whispering - ching chou kuik's Fantasy Art Collection (sheet 11, plate 38), sentiment (sheet 2, plate 21)- Sweet Pea Stamps
Paper: Basic Grey (Urban Couture), Dark Chocolate, White (Paper, Trey, Ink)
Ink: Memento Tuxedo Black, Walnut Distress Ink
Copics:
Skin: R00,E00,E11,E13,R20
Hair:BV000, BV01,BV02,B63,BV04
Clothes: R32,R35,R37
Cat: E25,E27,E29,E49,R00,R20, YG00,YG03,YG17
Misc: EK Success Border Punch, Recollections Pearls, Stardust Stickles

I hope you day is wonderful!
:-)Traci

Tuesday, April 27, 2010

Unveiling Sheet #48


Join the design team and I at SNR website Wednesday, April 28th @ 10:00 PM - 11:00 PM(eastern time zone). We will be unveiling the whole new sheet of Elaine Cox designs (the above design is one the stamps on there). I will be raffeling away at least 8 prizes (one lucky attendee will win this new Elaine Cox sheet of stamps). You will have a sneak peek at the next 4 ching-chou kuik designs (but this sheet will not be released yet).

Mondays Blog candy winner is----

Diamond Doll.... You have until Thursday, April 29 to contact me with your shipping info.
Thank you. Thank you to all who participated in the last 4 days blog candy. You can still have a chance to win by stopping by the SNR website on Wednsday @ 10:00 PM (eastern).
Have a good day!

The Serene Night

I love this beautiful stamp called The Serene Night from Plate #24. I stamped and colored in the image and then cut out a scalloped oval using Nestabilities. I layered the image on beautiful layered papers one that is embossed metallic and one that is bright sheer white color. The main card stock for this card is a light pink Bazzil paper.


I used metallic pink cutoffs to highlight the corners of the card and low level pop dots to raise each level of the card. The shiny level of the metallic paper really makes the image stand out without adding further amounts of embellishment. The image was colored using Copic Markers.

Monday, April 26, 2010

Last....Monday Blog's Candy

Our last blog candy giveaway until our one year party celebration at SNR. Today's canday is......
5 unmounted stamps, our choice (no sentiments). To be entered in our raffle, you must be on our blog follower list and post a comment here. We will pick a winner tomorrow, Tuesday.
Good luck everyone!

Sunday's Blog Candy Winner is........

Rufus. Congratualtions Rufus, you have until Wednesday, April 28th to contact me at sweetpearubberstamps@gmail.com
Thank you!

A Mother's Love - Plate#45

Can you believe Mother's Day is just around the corner? Seems like just yesterday was Easter!

For my card today I used another image from ©ching-chou kuik's Fantasy Art Collection, sheet 15, plate #45:

MothersLove

I decided to try a different Copic color to outline the image. I tend to always reach for C1 to make the image appear 3D (well, that and it hides any little mistakes where the color is outside the lines :-) ). This time I used BG93. I'm not sure yet if I like it or not. So I thought I'd let you guys decide......:-).

I also used my Nesties Label die and finally (hear me scream "Woohoo") got my Cricuit hooked up to my laptop and updated my SCAL software. Playing around, I cut a swirly frame which you can see on the right side of the card.

MothersLove closeup

Be sure to check out the Sweet Pea Stamps shop and don't forget to share YOUR Sweet Pea Stamps creations with us!

Thanks for stopping by!

How I mount and store my Sweet Peas

Hi everyone! It's Angela here and I wanted to share with you a tutorial on how I mount my plain raw rubber Sweet Pea's. First I cut out all my images then I turn them upside down. I did all my newest images outside as the weather was just too pretty to stay inside.


I use Aleene's 'TACK-IT' Over & Over glue. You can purchase it at Michaels that's were I got mine. You can probably find it on some on-line stores. I know Joann and Hobby Lobby carries the Aleene's glue but NOT the TACK- IT Over & Over glue. And that's what you need. Just to warn you this glue is VERY, VERY sticky. So keep a wet rag handy. Make sure you shake the glue up GOOD or it will be watery.


You will need a brush to apply the glue over the rubber. Any small to med. paint brush will work.
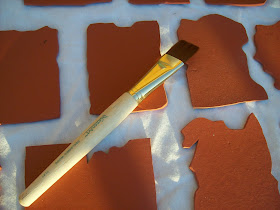
I just squeeze a small amount on the back of my stamps and brush all over the rubber, you may need to add more glue or less depending on the amount you need.


After you have applied the glue all over in even coats let them dry for at least an hour or longer just to make sure they are completely dry. When dry they will be sticky and you can attach then to your acrylic blocks if you want to stamp right away or they are ready for storage.


And I am going to show you what I use to store them on/in.


I use these clear plastic storage containers called Scrap Onizer's. I purchased mine at Unity Stamps but you can Google them and find them at other places. This was the cheapest place I found them at. You will also need to purchase the clear folders to attach them to. They come just like any other folder, but to get the best use out of them I cut them in half where they bend over. That way I have 2 pieces and I can lay them on top of each other. Here is a picture of one of the folders before I cut it in half.

After I have cut them in half they are ready to be attached to the clear folder and ready for storage. When you want to use one, just pull it off the folder, stamp, clean and stick back.


Here's a picture to show you where I started sticking my stamps to the folder. And you can see glue where the light is hitting the dry glue.


I turned the folder up side down to show you they are stuck and not going anywhere.


I also use the bottom of the storage container and stick some of my stamps to it. As it is made out of the same stuff. Then you can just start stacking up the folder halves on top of it.


Here is a picture to show you the container from the side. They are only about an 1" to 1.5" thick and can be stood up like a book. I have tried alot of different way's to store and attach my plain rubber stamps and this is by far the best to me that I have tried. I even use these container to storage my foam mounted rubber stamps. These storage containers works great for both. And the Aleene's TACK IT Over & Over glue is under $5 a bottle and this bottle goes a long way.


Well I just wanted to show you how I store my stamps and how I attach them to my acrylic blocks for stamping. I never have to worry about losing a stamp either and I can see through the containers. I also take a marker and write the stamp company on the spine of my containers. Here is a picture of how they look stood up on my shelf.


Today I also have a card to share that I colored last week and finished this week. I used Enchanting Gold by ching-chou kuiks fantasy art collection at Sweet Pea Stamps (plate #41).

Isn't she jsut beautiful? I get lost every time I color on of these images. Just the way they start to come to life. This is a pretty big image and I had so much fun with her.

Supplies:
Stamp- Enchanting Gold by ching-chou kuiks for Sweet Pea Stamps(Plate#41)
Ink- Memento Tuxedo
Paper: Image was stamped on Neenah Solor Crest, Metallic CS, DP- can't find at the moment
Accessories- Butterfly was cut out of the same DP, Leaves and flowers came from Hobby Lobby's Wedding Department, foam tape, added glitter glue to the flowers and leaves
COPICS:
Skin- E02,E00,E000,E50,E51
Hair-E49,E47,E57,E35,E53
Clothes: C0,C1,C3 and I went over it with a clear Sakura pen
Background- C5,C3,C1,C0

How to make a bow decoration.

How to make a bow:

Here's a little tutorial on how to make your own bows. It's very simple, you just need a good glue or tape if you prefer that.

My best tip ever is to only buy white ribbons and then colour them with your promarkers or copics. That way you will not only save money, but also always have the right shade of ribbon. Just be careful because you usually need to use a lighter shade on the ribbon than what you've used to colour your image. You can also use the backside of the ribbon that tend to be a bit lighter.  If you are talented you can even doodle on it to make it more personal.

Here's how I made the basic bow. You can mix colours, widths and materials as seen on the examples at the end.

Take two pieces of ribbon, the desired size of the bow twice as long and a smaller piece 3 times as the ribbon width.(You will understand it better further down)
Add glue to the edges of the longer piece and fold it so the edges meet in the middle. This is what the front looks like:

 Then take the smaller piece and fold it around the middle. Don't glue on the front, only the edges in the back.
Ta-daa, you're done. You can use the same ribbon or different widths and colours or even types. Why not an organza ribbon with a silk middle? Here is the fantastic glue I use for everything. It dries clear and is perfect to add metal, plastic or just about anything.


Here are a couple of cards where I've used this technique:

 Same ribbon throughout.

Coloured with different shades and glitter.
Double in different turquoise shades and widths with a flower and brad on top.


Hope you've enjoyed my tutorial and will give it a try . If you do, please link back to your work so I can have a look.

/Katarina

Sunday, April 25, 2010

Today, Sunday, April 25th, ONLY!

....save 10% on your order. Even receive 10% off of sale prices. (Previous orders excluded) You must go through this link to receive the discount on your order:

One Year Celebration!


Meet us for some small chit chat, celebrating our one year anniversay at SNR on Wednesday, April 28th at 10:00 PM Eastern time zone. Ask the design team questions, see some sneak peek designs and have a chance in some drawings for free stamps! See you there!

Sunday's Blog Candy is........


Since today is our 'official' one year anniversay, I am offering you another chance to win the 'celebration sheet'. Just post a comment in our comment section today, Sunday, April 25th. This is a 4" x 5" sheet. You must be on our blog follower list to be entered in the drawing. I will post the winner Monday. Good Luck to all!

Saturdays Blog Follower Winner is------------

.......Tany Sol. Tany Sol please e-mail me at sweetpearubberstamps@gmail.com with your shipping info by Tuesday, April 27th.
Congrats!

Mag - Forest Blue


Hi everyone !!!
I hope you are well :)
I used Forest Blue for this card :

Corners, borders and butterflies are Martha Stewart Punches
Leaves are punches from Punch Bunch
The frame is from  Spellbinders
Prima and Wild Orchid Crafts Flowers

Copics :
Skin  E000, E01, E11, R20
Hair : B01, B04, B06
Clothes : R02, R05, R08
Wings : G40, G82, G85
Sun : Y32, Y35, Y38

Big Hugs !!!
Mag :)

Saturday, April 24, 2010

Saturdays Blog Candy--

For todays blog candy, it will be 5 unmounted stamps, randomly picked. They will only be image stamps (no texts). You must be on our blog following list. How can you be entered? Just leave a comment today, Saturday April 24. Good luck to everyone!

Connie-"Time Flies" Made Time Fly For Me!


I was drawn to this lovely image by ching-chou kuik
when I first saw it and still love it. It is named
"Time Flies" and you will find it on plate 38
I used Cryogen White cardstock to stamp her on and colored with Copic markers.
I layered papers by DCWV "Old World" and Basic Grey "Sugar Rush".
I punched some leaves (Punch Bunch) a small tree (EK Success)
and the flowers were punched with my *new* Nellie Snellen punch that is a set of punches that also embosses the punched shape.  I cut them from the same papers I used for layering.
Here is a closer view of them:
A little sheer ribbon, some pearls by Kaiser and rhinestones by K and Co.
tops this one off.
I am really trying to improve my Copic skills, please bear with me.

Friday, April 23, 2010

Fridays Blog Candy Winner is----

Black Dragon. Congratulations Black Dragon. Please e-mail me with your shipping info. You have until Tuesday evening to contact me.

Friday's Blog Candy----

Plate #4
I will be radomly selecting a blog name out of the blog followers to win this 5"x7" sheet of
"Simply Verticals" some time tonight. You have until Tuesday to e-mail me with your shipping info. Thank you and good luck to each of you.


Enchanted garden and flower tutorial


This time I want to show you "The Serene Night" - another wonderful stamp from Sweet Pea that I hadn't played with until now. The text is from sheet 7 plate 29 and the stamp from sheet 4 plate 24. I actually had this image coloured and matched with the papers. It was laying around and I needed to clean my space a bit so I thought it was time to get it finished. I also made two flowers from a gift wrap paper that happened to match perfectly! I love how this card makes me feel - like I was in some enchanted garden.


Here's a detail of the embossed background with golden birds that I made:


Here's how I made the flower:
I used my blossom nesties, but you could use circles or cut shapes out by hand. I even embossed them to give them an extra edge, but I don't know if it really shows. Cut out 6-7 of them in silk paper (the ones you have to gift wrap)


 After you've cut them out, poke them into your hand like shown on photo to scrunch them up.


Glue them side by side and work your way around until you're satisfied with the result. You might want to use a smaller shape to fill in the gaps in the middle.


 Use different shapes to make different sized flowers:


And there you have it. If you use my tutorial, please leave a comment linking to your post so we can have a look.

/Katarina

Thursday, April 22, 2010

Long Weekend Giveaways!!!!!

I will be posting blog candy on Friday, Saturday, Sunday & Monday. You need to be a blog follower to win the giveaways. So as of right now, there is 307 persons who will be entered.

Customer Blog Hop Winner #1-----------------

is------------------------

Gina Lindsay.
Congratulations Gina!

3 winners For Customer Blog Hop

I will be drawing from 22 names (one had a problem posting and added it to the comments) for the blog hop today, I will be posting it periodically through the day. Keep posted.

Anyone for a game?


I am really enjoying the revival of Alice In Wonderland. I read the book and also Through the Looking Glass as a child and thoroughly enjoyed them. I will admit to probably being the only person in the world that has not seen the Walt Disney version, but am looking forward to seeing the newest one.
This image is from the Elaine Cox's Art Collection and not only has she provided some fabulous images inspired by Alice In Wonderland, but she has several owls, mermaids and fairies to offer as well. Elaine has a wonderful and whimsical style I adore!

Lisa Victoria's Rain Dragon

Today I would like to share with you the Rain Dragon from Lisa Victoria's Fantasy Art Collection. He is just so adorable! I colored him with copics.

Wednesday, April 21, 2010

Nostalgia

These beautiful stamps come from ching-chou kuik's fantasy art plate #30. I love the wispy look of this woman and I cut the image of the lady out of the main stamp to highlight her, as well as the background circle. I raised the image and mounted it on a dark black background.
I used several colors of Copic markers to color the image and Colorbox Chalk ink to add color around the text image after it was stamped. Flowers from Prima were added to the card along with brads from Basic Grey. I love the use of Yellow and Green in the springtime.